Christmas is over and we are on the doorstep of a brand new year. 2011 was a great year for me with lots and lots to be thankful for. I wanted to do a few posts on some of the Christmas gifts that I received this year. It was one of the most 'meaningful gift' Christmas's I have had in a very long time.
My friend and business partner is the person that I spend the most time with during any given week. She sees me at my best and my worst. She knows my likes and dislikes. She also has to put up with my constant rambling about my favourite hockey team.....and she doesn't even like hockey. That is what makes this gift so very special.
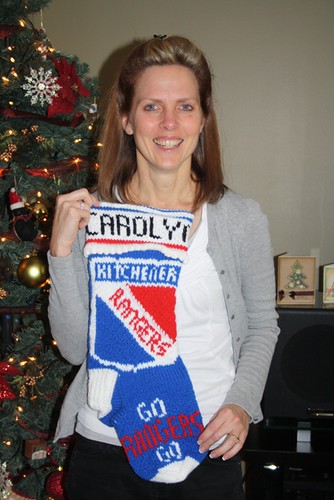
It is my very own Kitchener Rangers stocking.....with my name on it.
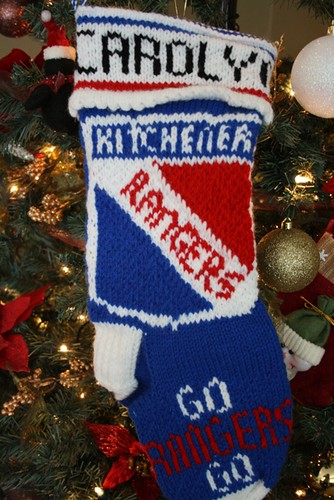
I was in total shock when I opened it and the first thing that popped out of my mouth was 'did you make this'? She quickly told me no, but that she did have it made for me.
She was at Wendy's (a local burger restaurant) and saw a similar stocking hanging there. She inquired about it and found out that someone that works there had made it.
Joanne frequented the restaurant until she connected with the artist and asked her if she would make one for a gift (for me, lol)! The woman said she had never made one for anyone else before and wasn't even sure she would have the time. Joanne begged and begged.
The fact that anyone would do something that nice for me makes this gift very special.
I will cherish this gift for Christmas's to come. Joanne, you are an amazing friend. The only thing that would have made it any better would have been if it was autographed by the team. Maybe you are saving that for next year.....a girl can always hope :)
Friday, December 30, 2011
Tuesday, December 27, 2011
Deck The Halls
I can't believe that this is my last Sketch Support layout for 2011! I have been a part of this Creative Team for 1 year and the time has flown by so quickly. I am happy to say that I have signed on for another year, so 2012 will be filled with more inspiration using these awesome sketches by Allison Davis.
This week it is one-page sketch week and here is the sketch we had to work with.
Here is the layout that I created using the one-page sketch. I stuck pretty close to the design with only a few little changes.
I did have some fun with the hanging ornaments. I used a digital image from Whimsie Doodles and paper pieced them to create my design. On the Santa image I added some liquid applique and glitter.
Rudolph is my favourite with his big red nose.
I inked the edges and added some wire to the top of each ornament too.
Instead of all the small photos, I replaced them with stickers. I matted them with cardstock and kept the placement the same.
I used stickers and chipboard for my title and I added some glittery thread and added the bow.
I did my journaling on the computer and then cut it into strips and attached it to my layout. I hope you have enjoyed the year of sketches from Sketch Support. There is lots more to come in 2012!
Friday, December 23, 2011
Christmas Trees
Christmas is in just a few days (I can't believe it)! I have finished all my shopping and even bought my groceries. Most of the gifts are wrapped and we are ready to go. I would like to take this opportunity to wish all of my scrapbook friends a very Merry Christmas and I hope that 2012 brings you much joy and happiness!
This week at Sketch Support it is add-on week. We are still keeping with the Christmas tree theme. Here is the sketch.
I decided to make a 3D version of this and I created 3 trees for my Christmas decor.
I used wrapping paper instead of scrapbook paper. There are so many pretty papers to choose from. I was a little worried that the paper was not double sided and the white showing would not look good. I actually don't mind it at all. The photos really don't do these justice. They are beautiful in my front hall.
I topped them with a chipboard star that I covered with wrapping paper and added a ribbon bow.
The creative team has made some really awesome projects using this sketch. Be sure to visit the Sketch Support site and check them out!
Tuesday, December 20, 2011
Two Scrapbook Friends Christmas Blog Hop!
Welcome to Day 11 of the 12 Days of Christmas Creations Blog Hop with Two Scrapbook Friends! You should have arrived here from Tammy's blog. Her projects were amazing. I especially love the place card/gift tag!
I have been so inspired by all the awesome things I have been seeing on websites and people's blogs for this Christmas season. Every year I make a list of all the things I want to try and I don't get around to doing many of them. I have really been noticing how you can wrap and embellish gifts. This was something I really wanted to try.
I recently accepted a design team position with The Cutting Cafe and my first cutting file was the Loopy, Loopy Bow/Flower. It was the perfect opportunity for me to make my own bows for some of my Christmas presents.
I began by wrapping my boxes in kraft paper (it is actually a couple of bags from Two Scrapbook Friends....creative, huh)? I used the cutting file and cut the bow template in the small, medium and large size. I assembled them and layered them together, fastening them with a large brad I found deep in my stash!
I added some curling ribbon and some jingle bells to accent the layered bow.
I used some 12x12 coordinating paper and created strips to tie in the rest of the gifts. I used a Martha Stewart snowflake border punch to fancy up the edges of the strips and make them a little more festive.
I hope this has inspired you to 'scrapbook' your Christmas gifts this year. Matt, my 15 year old son, told me that if he received a gift that looked like this, he would be pretty impressed. He said that if someone took all that time to make it look so good, there must be something pretty 'cool' inside.
Your secret word for today is HAPPY!
Tomorrow is the last stop on the 12 Days of Christmas Blog Hop and you will be visiting the Two Scrapbook Friends blog!
Make sure that you have visited all the blogs on the hop and left a comment at each one in order to qualify for the draw for a prize. You can view the complete list here!
I would like to take this opportunity to wish all my friends a very Merry Christmas! I hope you make some wonderful memories with your family and friends over the holidays!
I have been so inspired by all the awesome things I have been seeing on websites and people's blogs for this Christmas season. Every year I make a list of all the things I want to try and I don't get around to doing many of them. I have really been noticing how you can wrap and embellish gifts. This was something I really wanted to try. I recently accepted a design team position with The Cutting Cafe and my first cutting file was the Loopy, Loopy Bow/Flower. It was the perfect opportunity for me to make my own bows for some of my Christmas presents.
I began by wrapping my boxes in kraft paper (it is actually a couple of bags from Two Scrapbook Friends....creative, huh)? I used the cutting file and cut the bow template in the small, medium and large size. I assembled them and layered them together, fastening them with a large brad I found deep in my stash!
I added some curling ribbon and some jingle bells to accent the layered bow.
I used some 12x12 coordinating paper and created strips to tie in the rest of the gifts. I used a Martha Stewart snowflake border punch to fancy up the edges of the strips and make them a little more festive.
I hope this has inspired you to 'scrapbook' your Christmas gifts this year. Matt, my 15 year old son, told me that if he received a gift that looked like this, he would be pretty impressed. He said that if someone took all that time to make it look so good, there must be something pretty 'cool' inside.
Your secret word for today is HAPPY!
Tomorrow is the last stop on the 12 Days of Christmas Blog Hop and you will be visiting the Two Scrapbook Friends blog!
Make sure that you have visited all the blogs on the hop and left a comment at each one in order to qualify for the draw for a prize. You can view the complete list here!
I would like to take this opportunity to wish all my friends a very Merry Christmas! I hope you make some wonderful memories with your family and friends over the holidays!
Monday, December 19, 2011
The Cutting Cafe Design Team
I recently decided to apply for another design team position for a company that has SVG cutting files and printable stamps! I am happy to say that I was accepted to join the team for The Cutting Cafe!!!!!

Cutting files and printable stamps are a new addiction for me and I can't wait to show you some of the amazing things you can do with them. As a design team member, I am required to submit 3 projects each month, so you will get to see lots and lots of new ideas on my blog. I can't wait to get started.........as a matter of fact, you can see my first project on Tuesday for the final day of the Two Scrapbook Friends 12 Days of Christmas Blog Hop!!!!!

Cutting files and printable stamps are a new addiction for me and I can't wait to show you some of the amazing things you can do with them. As a design team member, I am required to submit 3 projects each month, so you will get to see lots and lots of new ideas on my blog. I can't wait to get started.........as a matter of fact, you can see my first project on Tuesday for the final day of the Two Scrapbook Friends 12 Days of Christmas Blog Hop!!!!!
Saturday, December 17, 2011
Snowman Card
So yesterday I decided that I would make a quick card for a special friend at the Ranger game. He is only 5 years old, but we share the love of watching the Rangers play. He gives me a 'high five' every time they score a goal. It was sort of a last minute idea and I wanted to take it to the game last night.
I used an SVG file from The Cutting Cafe to make this sweet snowman card. I used my Cuttlebug to emboss his hat and added some glitter to make it sparkle. I wrapped up some sweet stuff in some tissue too.
He was super excited when I gave it to him. To add to that, the Rangers won in overtime and a shoot-out! It was a great night.


