Q. Can you use more colours or just the 2 complimentary ones?
A. Yes! Make the 2 complimentary colours dominant thats all. You wouldn't want to colour Tildas face yellow after all!
Q. Do you use have to use the 'proper' colours like red and green?
A. Not at all, be adventurous, pink is a tint of red so you could use a dark green and light pink, aqua and tangerine like Lisa did, there are so many possibilities if you look at shades and tints of each colour :)
Q. Can I email my entry?
A. Yes! Make sure you get an acknowledgement, if you haven't received one within 48 hours then leave a message in the message box in the sidebar.


Sunday, 30 August 2009
Monday, 24 August 2009
Winners of Challenge 1
Firstly I'd like to say a huge Thank You to you all for entering our first challenge and hope you come back and have a go at challenge 2! I'm also really pleased to see some of you taking the plunge and creating your own blogs, well done!
We received entries from...
1. Clare 2. Valerie 3. Aunty Sue 4. Tracy 5. Chrissie 6. Angie 7. Kip (Vicky) 8. Ree Ree (Marie) 9. Lilian 10. Olga 11. Kat 12. Rachel 13. Jenny 14. Ann 15. Marsha 16. Chingya 17. Joana 18. Rowena 19. Scott 20. Milla 21. Caro 22. Irene 23. Looby 24. Josephine 25. Suzanne 26. Lynne 27. Janet 28. Beaumont Fox 29. Kathleen 30. Sarah (Clarabell) 31. Catherine 32. Mandy (Glitter) 33. Mandie F 34. Julie W
Random.org is picking the winner of the £10 Joanna Sheen voucher and it is.....

Next we have decided to have an award for 3 players each challenge which Rachel has kindly made for us! The design team will decide our favourite 3 each challenge and you will each get a blinky to proudly display on your blog (Don't worry it resizes itself to fit in sidebars!).
It has been really tough to whittle it down to just 3 as I loved them all and the team have chipped in and these 3 are our winners this time.
This challenges Blinkie winners in no particular order are...
Well Done! Please take you blinkie below, if you need help just give me a nudge!

Sunday, 23 August 2009
CHALLENGE #1 - BLOSSOMS
Welcome to our humble abode, please pull up a seat and make yourself comfortable :)
The way this blog will work (except this time) is I will post up some tutorials, links to tutorials, hints and tips etc PRIOR to a challenge so that you can use your knowledge when the challenge is set plus it will give you time to prepare. Obviously I don't know everything so please feel free to add comments or email tips in to be added. There will also be a question and answers thread or you can email me about anything craft and blog related.
Firstly I would like to introduce you to one of our sponsors, a very familiar name, Joanna Sheen
Joanna has been involved in crafts for 30 years, has written over 30 books from cookery to crafts and flowers. She is best known for her craft CDs, cardmaking and pressed flowercraft programmes and can regularly be seen on Ideal World and Create & Craft TV.
Her website is a gem of the latest craft goodies from stamps to CD's and flowers and pens to suit all budgets, tips and tutorials and projects galleries and if you see something you fancy its FREE postage and packing on most items worldwide! Please check out her site, apart from her shop she has a lovely friendly forum with lots to do!
Joanna is offering a voucher for one lucky participant, thank you Joanna!

Now onto our very first challenge!
I've chosen Blossoms (flowers) as a nice easy starter as we're a new blossoming group and everybody has flowers somewhere! Stamp them, stick them, pick them or make them from scratch the choice is yours! I'll show you the DT works and later on over the next week I'll highlight various ways of using flowers in your designs.
To enter, leave a link to your card in the comments box below, if you dont know how to do this there is a tutorial in the sidebar on the right or if it goes Pete Tong DON'T PANIC :-)
If you don't have a blog, please email entries in. Please post your entries by Noon UK time on 24th Aug.
Our design team is made up of very new cardmakers up to more experienced with a variety of styles and skills. We also have a special uber talented guest designer each challenge so you will see a full range of examples. Now remember, everyone starts somewhere (I sound like Granny Murray!) and I hope you start with us :)
So your challenge is to use flowers of any kind somewhere on your design :)


The butterfly stamps are from Clear Choice stamps and are stamped with stazon onto a background I made by rubbing Distress Inks over cream card. The flower is stamped onto an old book page that I stuck to some card and using a stamp that was free with Craft Stamper Magazine and then inked with the same Distress Inks (Mustard Seed, Old Paper and Walnut Stain). The ribbon and brown card was from my stash. Easy peasy!
A4 card scored at 12.5cm so it creates card base off centre.
16cm light pink card, 15cm green card, 14cm dark pink card – this has been embossed with big shot flowers textured plate then glitter added.
5cm x 21cm dark card again embossed with flowers plate but this time a pink inkpad used to highlight.
4 squares – 2 light pink & 2 green
Hero Arts flower set – this has been stamped with Versamark and then heat embossed with clear embossing powder

This is made up using a plain cream card to which I glued the purple backing, added some self adhesive flowery border and then put three photographs all of which show the wild rose tree which is in our back garden.

I used a flower paper for the vase shape, attached a piece of card and added two more flowers topped with buttons, the main flowers are 2 flowers topped with ribbon to make another flower.
A simple yet, in my opinion, effective card which with any sort of papers I am sure anybody could make. I started with a C5 size card, I used a sheet of "Hot off the Press" background paper, cut one sheet to size to cover the front of the card and use a glue roller to attach it. I then used a stamp I bought in a "Hot off the Press" kit and pink ink to stamp the swirls in each corner of the card. The tag in the middle is from the same kit, I cut it out and mounted it onto card (just to make it a little thicker) then attached it to the card with 3d foam. Last but not least two little gems attached to the tag on the front.

Sugar Nellie 'Blossom' stamp, coloured in with promarkers - image cut out using nestabilities scalloped oval dies and edged with distress ink. The backing paper was made using a matching flower stamp - stamped repeatedly on plain white card, coloured in with promarkers, edged with distress ink and glitter glue added to the flower centres for some sparkle. Strip of self-adhesive lace added to finish.

Patterned paper K & Co, silk flower recycled, decoupage flower in centre from patterned paper, stickles glitter glue and Sakura Glitter Pen.

I used Sugar Nellie's Country Cousins country garden, water coloured using whispers brush markers, lilac card stock and layered backing paper, a ribbon to cover the join then matted the image on gold mirri board. To finish it off I punched a scalloped circle from the same gold card and centering a flower cluster punched a smaller circle to make a free moving embelishment by fastening with three jump rings under the flower from Joanna Sheens site


My scrapbook page is 12 X 12
Flowers cut with Sizzix dies Flower Layers #3 and Three Leaf Stem
I die cut the flowers from patterned papers and then scrunched them up to make them look old and have some dimension. I only glue the centers on them to each other so they are 3 dimensional. I added bright buttons to the centers. The leaves are cut from a vine and I cut the actual leaves off and inked them to make them look old.

 The stamp is Papermania Vintage Flower. I stamped the image using ColorBox Midnight blue from one of their option pad, onto a cream coloured cardstock, that is similar to watercolour paper. Then used a brush and water to pull the colour from the edges of the images. I love using this technique as it is so quick and easy to do. Then once it had dried I used a Sukura clear stardust pen to add a little glitter to the centre and then used a Sukura clear glaze pen over the top to add a little more shine. I mounted on the same cardstock that I have coloured using the same ink pad. Then mounted it again on plain cream cardstock. I have used the ink to edge the card mounts as well.
For the main card, I wrapped a length of ribbon and added a pleated a ribbon bow, with a large brad in the centre. I mounted the flower on top and then added three brads on top of the ribbon.


I thought I'd go back to my roots with this challenge and use some peel offs, I think most cardmakers start with them or will use them at some point. The peel off is from a sheet of pansies and I chose the one in a vase. I stuck them onto card and cut them out then coloured them with copic markers and added stickles glitter glue to the centres. I also added some additional pansy heads to make it 3d.

Image is a digital stamp by Victoria Case which has been coloured with copic pens and I used nestabilities to cut out the oval. Flowers and leaves are punches and the centres are gems I coloured with copic pens to match.
BY BEAUMONT FOX

.jpg)
 BY KATHY O'M

The way this blog will work (except this time) is I will post up some tutorials, links to tutorials, hints and tips etc PRIOR to a challenge so that you can use your knowledge when the challenge is set plus it will give you time to prepare. Obviously I don't know everything so please feel free to add comments or email tips in to be added. There will also be a question and answers thread or you can email me about anything craft and blog related.
Firstly I would like to introduce you to one of our sponsors, a very familiar name, Joanna Sheen
Joanna has been involved in crafts for 30 years, has written over 30 books from cookery to crafts and flowers. She is best known for her craft CDs, cardmaking and pressed flowercraft programmes and can regularly be seen on Ideal World and Create & Craft TV.
Her website is a gem of the latest craft goodies from stamps to CD's and flowers and pens to suit all budgets, tips and tutorials and projects galleries and if you see something you fancy its FREE postage and packing on most items worldwide! Please check out her site, apart from her shop she has a lovely friendly forum with lots to do!
Joanna is offering a voucher for one lucky participant, thank you Joanna!
Now onto our very first challenge!
I've chosen Blossoms (flowers) as a nice easy starter as we're a new blossoming group and everybody has flowers somewhere! Stamp them, stick them, pick them or make them from scratch the choice is yours! I'll show you the DT works and later on over the next week I'll highlight various ways of using flowers in your designs.
To enter, leave a link to your card in the comments box below, if you dont know how to do this there is a tutorial in the sidebar on the right or if it goes Pete Tong DON'T PANIC :-)
If you don't have a blog, please email entries in. Please post your entries by Noon UK time on 24th Aug.
Our design team is made up of very new cardmakers up to more experienced with a variety of styles and skills. We also have a special uber talented guest designer each challenge so you will see a full range of examples. Now remember, everyone starts somewhere (I sound like Granny Murray!) and I hope you start with us :)
So your challenge is to use flowers of any kind somewhere on your design :)


The butterfly stamps are from Clear Choice stamps and are stamped with stazon onto a background I made by rubbing Distress Inks over cream card. The flower is stamped onto an old book page that I stuck to some card and using a stamp that was free with Craft Stamper Magazine and then inked with the same Distress Inks (Mustard Seed, Old Paper and Walnut Stain). The ribbon and brown card was from my stash. Easy peasy!

A4 card scored at 12.5cm so it creates card base off centre.
16cm light pink card, 15cm green card, 14cm dark pink card – this has been embossed with big shot flowers textured plate then glitter added.
5cm x 21cm dark card again embossed with flowers plate but this time a pink inkpad used to highlight.
4 squares – 2 light pink & 2 green
Hero Arts flower set – this has been stamped with Versamark and then heat embossed with clear embossing powder
JOY

This is made up using a plain cream card to which I glued the purple backing, added some self adhesive flowery border and then put three photographs all of which show the wild rose tree which is in our back garden.

I used a flower paper for the vase shape, attached a piece of card and added two more flowers topped with buttons, the main flowers are 2 flowers topped with ribbon to make another flower.
A simple yet, in my opinion, effective card which with any sort of papers I am sure anybody could make. I started with a C5 size card, I used a sheet of "Hot off the Press" background paper, cut one sheet to size to cover the front of the card and use a glue roller to attach it. I then used a stamp I bought in a "Hot off the Press" kit and pink ink to stamp the swirls in each corner of the card. The tag in the middle is from the same kit, I cut it out and mounted it onto card (just to make it a little thicker) then attached it to the card with 3d foam. Last but not least two little gems attached to the tag on the front.


Sugar Nellie 'Blossom' stamp, coloured in with promarkers - image cut out using nestabilities scalloped oval dies and edged with distress ink. The backing paper was made using a matching flower stamp - stamped repeatedly on plain white card, coloured in with promarkers, edged with distress ink and glitter glue added to the flower centres for some sparkle. Strip of self-adhesive lace added to finish.
Patterned paper K & Co, silk flower recycled, decoupage flower in centre from patterned paper, stickles glitter glue and Sakura Glitter Pen.

I used Sugar Nellie's Country Cousins country garden, water coloured using whispers brush markers, lilac card stock and layered backing paper, a ribbon to cover the join then matted the image on gold mirri board. To finish it off I punched a scalloped circle from the same gold card and centering a flower cluster punched a smaller circle to make a free moving embelishment by fastening with three jump rings under the flower from Joanna Sheens site

My scrapbook page is 12 X 12
Flowers cut with Sizzix dies Flower Layers #3 and Three Leaf Stem
I die cut the flowers from patterned papers and then scrunched them up to make them look old and have some dimension. I only glue the centers on them to each other so they are 3 dimensional. I added bright buttons to the centers. The leaves are cut from a vine and I cut the actual leaves off and inked them to make them look old.
 The stamp is Papermania Vintage Flower. I stamped the image using ColorBox Midnight blue from one of their option pad, onto a cream coloured cardstock, that is similar to watercolour paper. Then used a brush and water to pull the colour from the edges of the images. I love using this technique as it is so quick and easy to do. Then once it had dried I used a Sukura clear stardust pen to add a little glitter to the centre and then used a Sukura clear glaze pen over the top to add a little more shine. I mounted on the same cardstock that I have coloured using the same ink pad. Then mounted it again on plain cream cardstock. I have used the ink to edge the card mounts as well.
For the main card, I wrapped a length of ribbon and added a pleated a ribbon bow, with a large brad in the centre. I mounted the flower on top and then added three brads on top of the ribbon.

I thought I'd go back to my roots with this challenge and use some peel offs, I think most cardmakers start with them or will use them at some point. The peel off is from a sheet of pansies and I chose the one in a vase. I stuck them onto card and cut them out then coloured them with copic markers and added stickles glitter glue to the centres. I also added some additional pansy heads to make it 3d.
Backing paper is from stash and the green I distressed with a pair of scissors (It was not happy about it I can tell you!) and then rubbed distress ink using cut n dry foam (You can also just use a sponge) I also used a pink adirondack ink around the vase and drew in some doodling. I added more pansy heads to the bottom corner and some knotted ribbon as "leaves" The ribbon was coloured with copic pens to match as were the gems at the top and peel off sentiment.

Image is a digital stamp by Victoria Case which has been coloured with copic pens and I used nestabilities to cut out the oval. Flowers and leaves are punches and the centres are gems I coloured with copic pens to match.
EMAIL ENTRIES
BY BEAUMONT FOX
BY JULIE W
.jpg)
BY MANDIE F
 BY KATHY O'M
Tuesday, 18 August 2009
TUTORIAL - COLOUR THEORY
You've started making cards and things are going well but sometimes something just doesnt look right which you cant quite put your finger on.... Be honest, how many have actually read card composition and colour theory (what??) LOL! OK I'm a totally addicted crafter, I like to learn about my tools to get the best out of them and tools of making cards, scrapbooks and the like also include the use of colour.
We all know that primary colours are red, yellow and blue and that red and yellow make orange and yellow and are secondary colours but do you know which of these work well together?
Lets start right at the beginning...
Here is a basic colour wheel, print it off if you dont have one already :)

 SPLIT COMPLIMENTARY
The split complementary scheme is a variation of the standard complementary scheme. It uses a colour and then two colors adjacent to its complementary. It is a good choice for beginners, I use it the most myself!
TRIATIC
Probably the most common scheme used in cardmaking and scrapbooking, this involves using three colours spaced evenly around the wheel as it balances warm and cool colours. For best use let one colour dominate and use the others as highlights. It gives a strong visual contrast while maintaining balance.
 TETRADIC
The tetradic (also known as a double complementary) scheme uses four colours arranged into two complementary color pairs (as in a rectangle). This colour scheme can be difficult to use in equal amounts so you should choose one of the colours to be dominant and the others to highlight.
 And finally below is another snazzy colour wheel showing more shades and tints. I have this one on my wall and find it really useful in selecting colour schemes.

We all know that primary colours are red, yellow and blue and that red and yellow make orange and yellow and are secondary colours but do you know which of these work well together?
Lets start right at the beginning...
Here is a basic colour wheel, print it off if you dont have one already :)
 It is composed of your primaries (Red, Yellow and Blue) Next but one are your secondaries (Green, orange and violet) and your Tertiaries which are a mix of a secondary and a primary (Red-orange, yellow-orange, yellow-green, blue-green, blue-violet and red-violet.
You may have also heard the terms shade, tint and tone, what are these?
• Tint - Color + White (Red+White=Pink thus pink is a tint of red)
• Tone - Color + Grey (These make pastels)
• Shade - Color + Black (Red+Black=Burgundy thus burgundy is a shade of red)
• Value - How light or dark a color is.
• Aggressive - AKA 'Warm'. The yellows, oranges, and reds. These come towards the eye more (spatially) and are generally 'louder' than passive colors.
• Passive - AKA 'Cool'. The greens, blues, and violets. These recede from the eye more (spatially) and are generally 'quieter' than the aggressive colors.
OK so what colours go together?
There are 6 common colour schemes used in art & design. These are Monochromatic, complimentary, analogous, split complimentary, triatic and tetradic.
MONOCHROMATIC
Monochromatic colours are all the hues (tints and shades) of a single color. The tints and shades add depth and highlights. Simply select one "portion" such as blue from the colour wheel. The example is a blue-green monochromatic.

COMPLIMENTARY
Complimentary colours are those directly opposite each other on the wheel e.g red & green; blue & orange. They look good together and compliment each other. You can use them to create sharp contrasts or mix them to create a neutral grey.

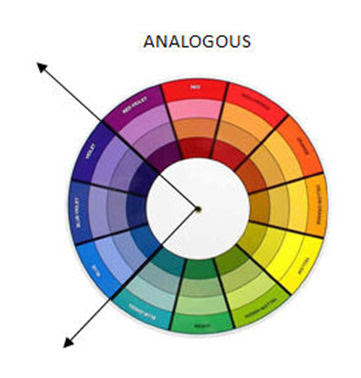
ANALOGOUS
These are colours next to each other on a colour wheel. Select any quarter of the wheel for an Analogous colour scheme.
As they are similar to each other they blend well particularly if one colour is used as the dominant and the others to add highlights. They create a sense of harmony and blend well together and are effective at showing depth. You will use this in your colouring such as with copic markers.
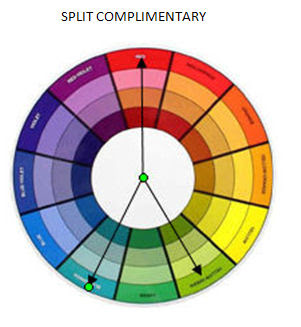
 SPLIT COMPLIMENTARY
The split complementary scheme is a variation of the standard complementary scheme. It uses a colour and then two colors adjacent to its complementary. It is a good choice for beginners, I use it the most myself!
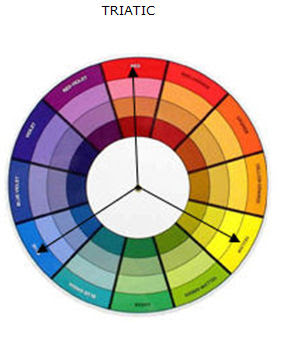
TRIATIC
Probably the most common scheme used in cardmaking and scrapbooking, this involves using three colours spaced evenly around the wheel as it balances warm and cool colours. For best use let one colour dominate and use the others as highlights. It gives a strong visual contrast while maintaining balance.
 TETRADIC
The tetradic (also known as a double complementary) scheme uses four colours arranged into two complementary color pairs (as in a rectangle). This colour scheme can be difficult to use in equal amounts so you should choose one of the colours to be dominant and the others to highlight.
 And finally below is another snazzy colour wheel showing more shades and tints. I have this one on my wall and find it really useful in selecting colour schemes.
Thursday, 13 August 2009
Blossoms Blossoms everywhere!
I've spied these lovely floral creations on my travels around blog land and thought I would share them with you. If you're feeling adventurous why not have a try at them!
Ribbon Blossom by Judy Laing. They are fun and funky to make. Judy's is smaller than the tutorial version on splitcoast stampers here but doesn't overwhelm the card. You simply use smaller lengths of ribbon or cut them down to suit.
Judy has a wonderful way with flowers, always a little bit different. Have a browse round her blog and check out her gorgeous lollipop flowers here

And Celebrate by Tab Robinson. I call Tab the "Master of the Mulberry" for what she does with those mulberry paper flowers. You know the ones that are sitting in the back of your drawers with stems on that you dont quite know what to do with, well Tab has breathed new life into them with a "Bit of Glimmer mist and Glamour dust" which is becomming a catchphrase lol!
Check out her blog for more dazzling mulberries


Ribbon Blossom by Judy Laing. They are fun and funky to make. Judy's is smaller than the tutorial version on splitcoast stampers here but doesn't overwhelm the card. You simply use smaller lengths of ribbon or cut them down to suit.
Judy has a wonderful way with flowers, always a little bit different. Have a browse round her blog and check out her gorgeous lollipop flowers here
And Celebrate by Tab Robinson. I call Tab the "Master of the Mulberry" for what she does with those mulberry paper flowers. You know the ones that are sitting in the back of your drawers with stems on that you dont quite know what to do with, well Tab has breathed new life into them with a "Bit of Glimmer mist and Glamour dust" which is becomming a catchphrase lol!
Check out her blog for more dazzling mulberries
Here's a couple of Lollipop Flower tutorials I also found for you.
If you're feeling *really* brave you might like to have a go at a chiffon flower. It involves setting fire to it so I'll sit this one out lol! Take a peep over at Midnight Madness challenge blog
Monday, 10 August 2009
BLOG CANDY WINNER!
We have a total of 19 correct entries listed below in order of hitting the correct answer which of course was Joanna Sheen and Imag-e-nation (or La Pashe)
1. Louise (Looby)
2. Jana78
3. Ch3rrie
4. Gemma W
5. Julie W
6. Caro
7. Valerie J
8. Crazy craft shed
9. Sarah B
10. Lisa
11. Maureen
12. Teresa W
13. Shell
14. Josephine
15. Sarah (Clarabell)
16. Nicola
17. Aunty Sue
18. Craft Chick
19. Tarts wot craft
And random.org says the winner is.....

1. Louise (Looby)
2. Jana78
3. Ch3rrie
4. Gemma W
5. Julie W
6. Caro
7. Valerie J
8. Crazy craft shed
9. Sarah B
10. Lisa
11. Maureen
12. Teresa W
13. Shell
14. Josephine
15. Sarah (Clarabell)
16. Nicola
17. Aunty Sue
18. Craft Chick
19. Tarts wot craft
And random.org says the winner is.....
NUMBER 16 - NICOLA!
Well done sweets! Please email me your address!