how's that for a fancy title.
The
Precious Remembrance team is joining
Paulina for this week's
10 minute craft dash! I have to admit that this was my hardest one. I never work with lavender and Precious Remembrance is more sentiment than image oriented. Apparently, in a time crunch, I rely on cute smiley faces to make my card look more impressive than it really is ;)
The rest of the team will be showing off the new PR set, "
little one." My international mailing saga has taken a turn: the package was apparently re-routed to somewhere in Chicago by the Canadian customs department. Don't ask. I have no idea.
Here's how I spent my 10 minutes:
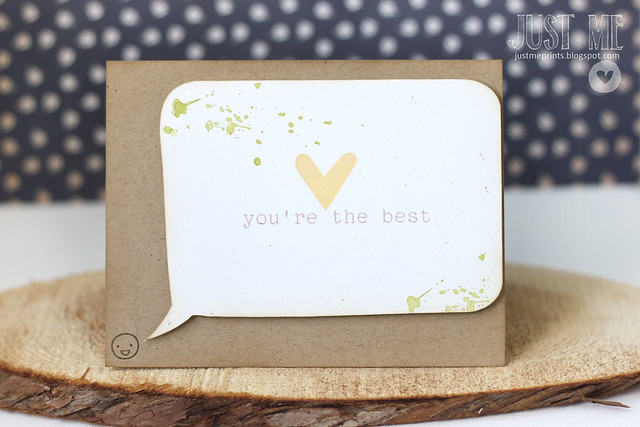
minutes 1-2: immediately turned on my silhouette, selected a speech bubble shape from my library and set it to cut. In the meantime, I gathered my PR stamps:
positive thoughts and
mom & dad.
minutes 3-5: stamped the heart in yellow, the sentiment in purple, and the splotches in green. color combo success. I sponged around the edges.
minutes 6-7: created a folded card base, sponged around the card edges, and rummaged through my stamps for that little lawn fawn smiley. Apparently, I still needed a smiley face, and even the tiniest one would do.
minute 8: stamped it in the bottom left corner.
I ended with a time of 8 minutes and 4 seconds. No fuss, no muss. My quickest dash time ever!
Precious Remembrance is sponsoring this week's dash - click *
here* to sweat your way to a 10 minute card.


Day25.jpg)


Day17.jpg)


Day10.jpg)


-AppSneak.jpg)
