💥 TRENDING: Gallery - HD Photos!

Tuesday, 25 May 2021

Fiesta Gitana Quilt - English Paper Piecing Tips!

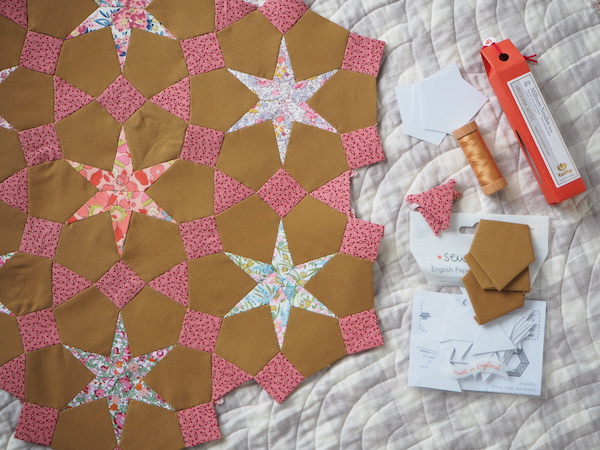
Fiesta Gitana is the cover quilt from the Millefiori Quilts book 4 by Willyne Hammerstein. Certainly not for the faint hearted, this is a pattern for those English Paper Piecer's who have a lot of practice under their belt and love a challenge! At Sew & Quilt, we have created English Paper Pieces to make the quilt, along with matching acrylic templates with a 3/8" added seam allowance to cut out your fabrics and fussy-cut to your hearts desire!

Truth time, I found it tough to begin, unpicking many seams when they weren't lining up and looked miles out!? Then checking that the templates were the right size, checking my basting was tight, not tight enough? As I was sewing more of the shapes together, I realised the slightest millimetre can throw off the next shape and then you can look a mile off where needed, then joining to the sharply pointed kites made it even more noticeable. After some practice and testing out the joining sequence in a couple of different ways, I landed on a way that resulted in neater joins. So I thought it was a must to share with you all incase you fancied having a go too. Please see below the link to click on and download the block assembly guide.

English Paper Piecing Tips

The most important tip is to manipulate your templates to where they need to be. Do this by pulling your fabric basted pieces in the exact position it needs to finish when sewing a new shape onto a previous one. Also make sure to start sewing at the correct starting point, flip the shapes so you look at them from the front side and see how they look, be careful to keep this position and use a Clover Wonder Clip to keep them secure if needed. 

If you've sewn a shape from the starting point slightly off where it should have been sometimes you will have to unpick and start that seam line again as it could throw off the next piece etc. Now you understand why I said this was a challenge! :-D

Download the block assembly for English Paper Piecing the Fiesta Gitana Quilt Pattern here. Do let me know if it proves useful for you, the same tips can be applied for other tricky EPP quilts too. Happy sewing! Links for products below.

Please note you will need a copy of the Millefiori Quilts book 4 to make the quilt, my block construction is simply to help with EPP methods only, full copyright belongs to Quiltmania the book publisher.


Please find a link to the supplies below;

Fiesta Gitana English Paper Pieces

Fiesta Gitana Acrylic Templates

Fabrics used; Selection of Liberty Fabrics for the stars, Art Gallery Fabrics Pure Elements Golden Bronze for background. 

Monday, 29 March 2021

Scallop Placemat - Free DIY Sewing Tutorial


What better way to decorate your table for Easter than with these very pretty (and very on-trend!) scalloped placemats. Easter will look a little different again for us all this year, but add some homemade charm to your table setting this year to create a special day. I have used one of our new Liberty Piccadilly Poplin fabrics for the bias binding and Essex Linen for the main part, these are a cotton/linen mix and work so well for a huge range of sewing projects. I'm so excited for our kitchen renovations to be finished so I can create some beautiful tablescapes using these placemats finally! 

Click here to download the placemat template. Be sure to print full size-A4. I have included a 1" square for reference, so you can check you have the correct scale. No major drama if it's a little out, your placemat might just turn out a little smaller/bigger. 


Supplies

1/2m of fabric for the main section (I have used Essex Linen, Seafoam).

55" x twice the width of the finished Bias Tape Maker (cut on the bias) for the binding. (I have used Liberty Canyon Clover B, Poplin)

Hera Marker

Bias Binding Maker (I have used 3/4", but a wider 1" would be more of an impact and easier to work with)

Fabric Marking Pen

505 Temporary Spray Adhesive (optional)

16" x 16" cotton wadding/batting


Assembly

1. Print and cut four copies of the template provided. Stick them together (with no overlap) using Cellotape to make one finished scallop shape.

2. Cut (2) 16" squares from your background fabric, and (1) from cotton batting. It doesn't have to be exact, just so long as you are larger than the finished template. I have used regular cotton batting here, but you could also use special heat protective wadding that's used in oven mitts or double up on the layers if you prefer a more lofty look. 

3. Layer the batting between the two outer fabric squares. Use 505 spray adhesive to sandwich them together, or quilting pins. I chose the spray on the occasion for speed. I've not tried spray basting a quilt before, so this might be a good way to road test it before taking the plunge.


4. Line your quilt sandwich straight on your cutting mat, and mark 45-degree straight lines with a Hera Marker along the square with a 1" spacing. To find the 45-degree angle ready for marking, place your ruler so the 45-degree markings on the ruler line up straight with the edge of your cut square. Use this first line as a guide, and measure 1" out and so on. 

5. Sew on your Hera Marker lines. Increase the stitch length for a neater finish (and it goes without saying for most I'm sure, but don't forget to put your walking foot on your sewing machine! I totally forgot, and then wondered why my lines were looking warped!).

6. Flip the square around and mark lines in the other direction, and sew on the straight lines.

7. Place the paper template over the quilted square and draw around with a fabric marker pen.


8. Cut out on the drawn line. 


9. Cut the correct width of bias binding required for your bias tape maker. I have used an 3/4" (18mm) maker, however I think the 1" (25mm) would look better and make more of an impact - I just used what I had on hand. You will need to cut strips on the bias (just how you did when marking out the quilting lines) and join together to make a length of 55", or thereabouts. Run the fabric through the tape maker, sloooowly to make sure you have it nice and centered. 

10. Simply place the bias tape onto the placemat, leaving a tail of approximately 3" and pin at various points, especially at the corners. Very unhelpfully of me, I forgot to photograph this part, but I will add some photos when I make the next placemat this week. Though I found it helps to have the pins placing inwards. Stop sewing when you are about 4" away from the starting point. Join the bias binding together with your fingers to the finishing point and press it firmly. Press this with the iron and then mark a line. Carefully have these unruly ends pinned, so you can sew along the straight line you have just made. Trim off the excess tail. Continue sewing the binding in place as you were. Finished!

Luckily I only have 1 extra one to finish in time for the big day, but I'm planning on a set of 6 matching ones and I should be finished in time for when I might actually get to use them (post-lockdown!). You could also make mix-and-match colours for a unique, homemade look too. Or go to town with coordinating napkins to add charm and set the table for a special day. 

Fabrics and supplies all available from Sew & Quilt

Saturday, 14 November 2020

The FREE Jane Austen Quilt Pattern

The beautiful Jane Austen quilt! A remarkable patchwork quilt that is thought to be made by Jane Austen herself, alongside her sister Cassandra and their mother. It was created in the traditional technique of English Paper Piecing, whereby fabrics are tacked or basted to a paper template and then whipstitched together. 
Myself and Robin have drawn up a meticulous reworked version of the original patchwork coverlet FREE for you to recreate this spectacular quilt as well. 


It features a medallion style diamond centre panel with a broderie perse appliqued design of birds and a basket of flowers. Broderie perse is the technique of selecting and cutting motifs from chintz and other such fabrics and needle-turn appliquéing them to different background fabrics to create a new design. We have omitted a specific appliqué design for the medallion centre, so you can create your own. The main section of the quilt top is then made up of diamonds pieced between a cream and navy dot sashing, finished with a deep border of smaller sized paper pieced diamonds. 

We have been asked to make paper pieces for the Jane Austen quilt for many years, and for one reason or another it always ended up on the back-burner. Though when I heard news of a Jane Austen At Home fabric collection to launch I knew it we had to make time! To one of our loyal Festival of Quilts shoppers each year (whose name escapes me now!) that always asked, can we do the Jane Austen papers - this is for you! ;-) 

We are offering a free downloadable 5-A4 page PDF pattern through Sew & Quilt. We also have printed copies if you don't have access to a printer, and prefer a hard copy rather than online viewing. Wow, it was quite the brain exercise to create and draw up the pattern, so much so that I'm not sure we would have done it had I known that from the start, lol! Download your Jane Austen Quilt Pattern here.

Quilt Size: 71” x 89”


What do I need to make the quilt?

You will need the Jane Austen English Paper Piece Kit to complete the quilt top. 

We have created two options for you;

- Starter size kit, which is just one regular size pack of each (+1 extra of one, in order to cut down, details included in the pack and on the product listing) of our standard sized bag options we sell at Sew & Quilt, put together as one item for you to purchase. 

- Complete kit, which includes all the paper pieces required to make the quilt top (though it doesn't include all of the small diamonds for the border, as we thought you could reuse some of those, given the large amount). 

We have all the information inside the pattern on total numbers of pieces, and the EPP kit product page gives details on pack sizes (if you wanted to work out how far the starter kit will get you). 

We also have matching acrylic templates, these include a 3/8" seam allowance. 

What fabric do I need to make the quilt?

We have provided yardages requirements in the quilt pattern, based on cutting rectangles, as noted this will be the most wasteful in terms of fabric usage. However this is the only way we are able to give you an accurate yardage requirement. 

You will need 22 fat quarters for the main quilt top. 

5-1/2 yards ~ 5.25m approx. (large diamonds). For our version, we have used 18 FQ's from the Jane Austen At Home Collection + an additional 4 which are duplicated.

I hadn't even thought to mention in the quilt pattern which ones they were (silly me!), but it's important you should know this information which is not included in the pattern:

The four duplicated FQ's for our design are; Elinor 04, Harriet 09, Margaret 11 and Penelope 15. 

4-1/2 yards ~ 4.25m, approx. (Cream with Navy Dot, for sashing fabric)

9 yards ~ 8.25m approx. (borders, I would advise using up your fabric stash as the pieces are very small so you don't necessarily need the same collection, just stick with on-theme prints. 

3/4 yard ~ 0.75m (binding fabric)


The photo above shows you can cut (24) 3" 5-point diamonds to a (UK sized) fat quarter. Our pattern says you can cut (12) to a FQ, because as mentioned above we have based this on rectangles. Instead cutting this way (using the Jane Austen acrylic template set) you can be more frugal with your fabric. 


The Jane Austen fabrics are sold out? 

If our Jane Austen FQ bundle and the 4 additional FQ's mentioned above are out of stock, don't worry. I would instead suggest you use our numbered key of 0-17 and gather other fabrics and label each print 0-17. That way you can still follow along with our numbered diagram. Remember you will need two FQs of numbers 04, 09, 11, 15, when using our cutting instructions from the quilt pattern. 

Find all our Jane Austen Quilt products online at Sew & Quilt

I really hope you have fun making this quilt, it is a beautiful design that has stood the test of time and will no doubt become a family heirloom - which is what we are all about at Sew & Quilt; 'Creating your future heirloom today!'.


Please share your versions of the Sew & Quilt Jane Austen quilt pattern, using the hashtag #JaneAustenEPPQuilt so we can share progress and updates online!

Wednesday, 24 June 2020

Easy Fabric Box Sewing Pattern - Free Tutorial!

I've been after some storage boxes for my Ikea Billy bookcase in my sewing room since the day we put it together, but after much searching I had no luck in finding the right size or style (and spoiler alert, I'm incredibly fussy...). I also wanted to use up some spare fabric I had from a recently reupholstered chair - ok, ok, I bought extra so everything would match... 

So I decided to make some fabric boxes, after a quick google I came across a bunch of tutorials and patterns to make different variations but they either used supplies I didn't have access to, or I couldn't make head nor tail of the instructions, or more importantly I then couldn't work out how to re-work the pattern to re-size them for the size I needed.


So, if you're looking for a really easy-peasy fabric box for storage, which keeps its shape, really sturdy and a simple way of making with minimal pieces to cut you've come to the right place! I've tried to make this particular box as simple as possible, so while there will be better patterns out there which will give you a super neat interior, here you have simplicity. You do have the option of adding bound edges to the interior but I have omitted that in several of my versions for speed (I mean, who has time for that really? Plus it's not noticeable once they're stuffed to the brim, which is a likely ending to this particular shove-it-all-in-until-it's-tidy project).


Example box shown measures approx; 13-1/2" wide x 9-1/2" deep x 8" tall.
To make one box to the dimensions above;

Supplies
1m Exterior fabric (Liberty Emilia's Blooms B Augusta Linen)
1m Interior fabric (Essex Linen, Natural)
1 yard Bosal Craf-Tex Plus, or other heavyweight double-sided fusible stabiliser
Clover Jumbo Wonder Clips
Gutermann Textile Fabric Glue
Optional: 1m Iron-on Interfacing, Firm

Cutting
From exterior fabric;
Cut (1) Piece A = 25" x 14"
Cut (2) Piece B = 10-1/2" x 8"

From interior fabric;
Cut (1) Piece A = 25" x 14"
Cut (2) Piece B = 10-1/2" x 8"

From heavyweight fusible Stabiliser;
Cut (2) Piece A = 9" x 13"
Cut (2) Piece B = 9-1/2" x 7"

Assembly
Use a 1/2" seam allowance.
If your fabrics are particularly lightweight you may want to use some medium or firm-weight fusible interfacing to strengthen up your fabrics, before you begin (my example shown used interfacing on exterior pieces).


Step 1.
Fuse stabiliser between an exterior and interior side piece B. Repeat for both side piece B's. Set to one side.


Step 2.
Place exterior fabric piece A right sides down, place both stabiliser A pieces on top, 1/2" (approx) from the edges. Place the interior fabric piece A on top. Press well to fuse everything together.
Excuse my patched-together interfacing shown here, I didn't have one piece large enough!


Step 3. 
Fold piece A in half along (along the longer side) mark the centre point.


Step 4.
Measure to find the centre point of your side piece B's, mark the point. Place the two marked points together (right sides together). Sew the side piece B to the main piece A.


Step 5. 
Repeat the step above and sew the other side piece B to the main piece A. You will have something that resembles a cross shape now.


Step 6.
You can visualise how this comes together now, so begin sewing the sides together so you have all 4 sides joined. The Jumbo Clover Wonder Clips really work a treat for this part. Before you tackle sewing a side, you can carefully cut into the join of the fabric so it eases out the very corner (as shown in final photo).


Step 7.
At this point you can make your box look neater on the interior side by sewing 2" wide binding strips to the sides. I added it to the 4 vertical seams, but you can choose to omit this step or be cover even more of the raw seams.