
Hello everyone, Deb here today with the final stop on our Destination Inspiration journey for August. If you will remember from Nikki, Alison and Annie's posts our travel bags are packed with the following supplies:
Now I cannot tell a lie, I had one heck of a time deciding what I was going to do with these ingredients! After much indecision and rummaging through my craft stash I came upon some of Tim Holtz's Mini Mason Jars and the accompanying Photo Clip Kit and the idea for my Beware Halloween altered mason jar was born.

It went through a few design changes and bumps along the road as you'll see in my step out photos but I really love how it turned out in the end. I even ended up adding a battery operate votive to make it into a spooky Halloween night light.

Read on for my how to if you'd like to make one of your own.
I initially was going to use the large skull and crossbones stamps from Tim Holtz's Regions Beyond stamp set inside the jar so I used the stamp as a template to see where to put the texture paste on the outside of the jar. I added both crackle paste and sanded texture paste in the beginning but the crackle paste flaked off once dry so I ended up going over the jar again with more of the sanded texture paste.

Once dry, the texture paste was sealed with matte medium and then washes of beige, brown and dark brown acrylic paints were added, letting each wash dry thoroughly in between.
To line the inside of the jar, dark brown kraft core cardstock was run through the Poison Labels Texture Fades embossing folder and sanded to reveal the kraft core (I forgot to take a picture before I put it inside the jar so this is a remnant that was left over!).

The embossed cardstock was curved around the back 'wall' on the inside of the mason jar and crushed walnut shells were coloured with dark brown acrylic paint and mushed into the bottom of the jar.
I decided to use the small skull and crossbones from Tim's Mini Halloween stamp set instead of the larger image, so stamped it onto Heavystock mixed media cardstock that was coloured with Antique Linen and Old Paper Distress inks and then spritzed with Pumice Stone and Gathered Twigs Distress Spray Stain. To emphasize the eye sockets, I coloured them in with a black Sharpie and fussy cut the stamped image.

The skull was tacked on the inside of the mason jar with a bit of matte liquid adhesive and a couple of Lost Zombie hands that I had left over from a previous project were added in the same manner, positioned so that they appeared to be reaching up from the dirt to grab you bwa-ha-ha-ha! You can't see it in the picture but I also added a 'toxique' label from Tim's Curiosities Ephemera pack layered overtop of the embossed cardstock in the back.
The Photo Clip Kit that coordinates with the Mini Mason Jars was stippled with multiple colours of brown, rust, teal and black acrylic paints for a rusty appearance.

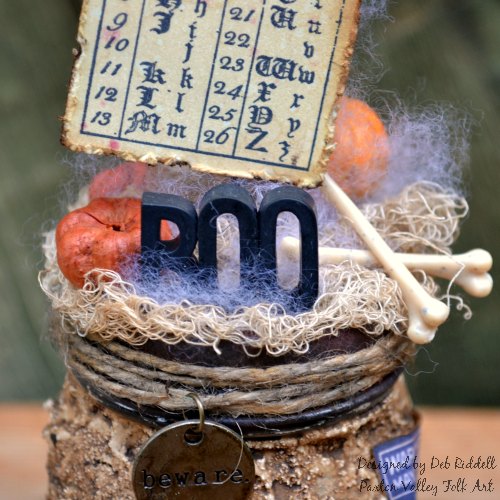
Jute string was wound around the edge of the lid and coloured with shades of black and brown Distress inks. A piece of coffee stained cheesecloth was inked with the same colours and added to the top of the rusty lid. Some labels from Tim's Curiosities and Halloween Ephemera packs were added to the sides and back of the jar.

The word BOO from Tim's new Halloween Typography letters was adhered together with some liquid adhesive.
The Gothic alphabet stamp from the Mini Halloween set was stamped onto more Heavystock that was coloured with Antique Linen and Old Paper Distress inks and then some 'blood spatters' were stenciled onto the stamped image through the Speckles stencil with Aged Mahogany Distress ink.

A wee chipboard bat was coloured black and adhered onto the top of the bulldog clip.
Then in my usual style I got on a roll and forgot to take anymore in process pictures so here are some close ups.
A 'beware' Halloween Typed Token was coloured with Mushroom alcohol ink and attached to the jute twine around the lid.

One of Tim's Pumpkin Pieces and a couple of putka pods from my stash were added to the top of the lid along with the BOO word and a couple of Boneyard Findings bones.
No Halloween make would be complete without a spider so I coloured a chipboard spider with a black marker and added him to the back of the Photo Clip, hanging him off some fiberglass spider web that was in my stash (no idea what this material actually is but it makes great spider webs!).

And here are a few more close ups of the finished jar.


And here's a review of the other projects made by the Creative Guides participating in our Destintion Inspiration journey this month.


Love the diversity of these projects! Thanks so much for stopping by today and hope that you have entered our Watercolour challenge this month, if not you have until September 1st so break out those watercolours and join in the fun! Have a great week and as always, happy creating!
Deb xo
Product - Texture Paste
Technique - Layering
Colour - Neutrals
Substrate - Glass
Now I cannot tell a lie, I had one heck of a time deciding what I was going to do with these ingredients! After much indecision and rummaging through my craft stash I came upon some of Tim Holtz's Mini Mason Jars and the accompanying Photo Clip Kit and the idea for my Beware Halloween altered mason jar was born.

It went through a few design changes and bumps along the road as you'll see in my step out photos but I really love how it turned out in the end. I even ended up adding a battery operate votive to make it into a spooky Halloween night light.

Read on for my how to if you'd like to make one of your own.
I initially was going to use the large skull and crossbones stamps from Tim Holtz's Regions Beyond stamp set inside the jar so I used the stamp as a template to see where to put the texture paste on the outside of the jar. I added both crackle paste and sanded texture paste in the beginning but the crackle paste flaked off once dry so I ended up going over the jar again with more of the sanded texture paste.

Once dry, the texture paste was sealed with matte medium and then washes of beige, brown and dark brown acrylic paints were added, letting each wash dry thoroughly in between.
To line the inside of the jar, dark brown kraft core cardstock was run through the Poison Labels Texture Fades embossing folder and sanded to reveal the kraft core (I forgot to take a picture before I put it inside the jar so this is a remnant that was left over!).

The embossed cardstock was curved around the back 'wall' on the inside of the mason jar and crushed walnut shells were coloured with dark brown acrylic paint and mushed into the bottom of the jar.
I decided to use the small skull and crossbones from Tim's Mini Halloween stamp set instead of the larger image, so stamped it onto Heavystock mixed media cardstock that was coloured with Antique Linen and Old Paper Distress inks and then spritzed with Pumice Stone and Gathered Twigs Distress Spray Stain. To emphasize the eye sockets, I coloured them in with a black Sharpie and fussy cut the stamped image.

The skull was tacked on the inside of the mason jar with a bit of matte liquid adhesive and a couple of Lost Zombie hands that I had left over from a previous project were added in the same manner, positioned so that they appeared to be reaching up from the dirt to grab you bwa-ha-ha-ha! You can't see it in the picture but I also added a 'toxique' label from Tim's Curiosities Ephemera pack layered overtop of the embossed cardstock in the back.
The Photo Clip Kit that coordinates with the Mini Mason Jars was stippled with multiple colours of brown, rust, teal and black acrylic paints for a rusty appearance.

Jute string was wound around the edge of the lid and coloured with shades of black and brown Distress inks. A piece of coffee stained cheesecloth was inked with the same colours and added to the top of the rusty lid. Some labels from Tim's Curiosities and Halloween Ephemera packs were added to the sides and back of the jar.

The word BOO from Tim's new Halloween Typography letters was adhered together with some liquid adhesive.
The Gothic alphabet stamp from the Mini Halloween set was stamped onto more Heavystock that was coloured with Antique Linen and Old Paper Distress inks and then some 'blood spatters' were stenciled onto the stamped image through the Speckles stencil with Aged Mahogany Distress ink.

A wee chipboard bat was coloured black and adhered onto the top of the bulldog clip.
Then in my usual style I got on a roll and forgot to take anymore in process pictures so here are some close ups.
A 'beware' Halloween Typed Token was coloured with Mushroom alcohol ink and attached to the jute twine around the lid.

One of Tim's Pumpkin Pieces and a couple of putka pods from my stash were added to the top of the lid along with the BOO word and a couple of Boneyard Findings bones.

No Halloween make would be complete without a spider so I coloured a chipboard spider with a black marker and added him to the back of the Photo Clip, hanging him off some fiberglass spider web that was in my stash (no idea what this material actually is but it makes great spider webs!).

And here are a few more close ups of the finished jar.


I hope that you've enjoyed seeing how I used the contents of my travel bag this month!


Love the diversity of these projects! Thanks so much for stopping by today and hope that you have entered our Watercolour challenge this month, if not you have until September 1st so break out those watercolours and join in the fun! Have a great week and as always, happy creating!

Deb xo


