


tomato tomato
🔒 EXCLUSIVE: Profile/invisibleinc - High Quality
Tabula Rasa Games
264
Posts
22
Topics
133
Followers
105
Following
A member registered Oct 06, 2019 · View creator page →
Creator of
SQUAD UP! the easy to learn, fast playing crunchy TTRPG of Special Forces on deadly and deniable missions
go to war on the moon in this classic JRPG
Role Playing
you are the most advanced AI doll ever sold. you are also self aware. protect your child. kill your masters.
it's time for you to refresh the tree of liberty with the blood of patriots and tyrants
Role Playing
A bookmark that can act as a DM for your D&D game! Everyone gets to PC!
An asymmetrical semi-cooperative quasi-competitive TTRPG--on a bookmark.
Let's make a Psionics TTRPG adventure set in dystopian ( i.e. 2019) America.
Anti-fascist historical TTRPG about uprisings of the oppressed: round 1 set over the fall of Weimar-era Berlin.
Recent community posts
"Everyone missing a good chunk of active and passive skills at this point in the chapter because of a lack of SP definitely feels bad. You kind of have to sacrifice between active skill synergy or passives that you had before. And splitting up SP to get some passives and some active skills just leaves you a lot weaker and ill-prepared."
Here is the INTENDED behavior for what happens (or at least what SHOULD be happening) to your stats, skills, levels, items, and gear upon death and Reincarnation.
HOW STAT/SKILL/EQUIPMENT PRESERVATION IS SUPPOSED TO WORK (For The Immortal Shadow)
When you die , you lose 1 level and most of your skills. When you Reincarnate, you gain +50 jp to spend for each level beyond your first. Your AP allotments should persist. HALF of any RESOLVE loss/INTELLECT gain from learning spells should persist (a last minute balance change was made to change this from all to half, because I got tired of Reincarnating in a new Vessel with a starting Resolve score of like 3 because I had stupidly learned like every spell possible as the last Vessel, and thought players would tire of this too, even if the obvious fix for that playstyle (OF MINE!) is 'maybe don't cram EVERY SINGLE SCRAP of FORBIDDEN KNOWLEDGE you come across into your skull, genius'). Skills learned from the Egyptian Pantheon or other "special" means should not be lost when you die and Reincarnate (if you bought Blessing of Bast through the Learn Skills menu, it will be lost, but if you received it from Bast herself in Egypt, you'll still have it).
In the seven weeks since the last round of pre-alpha development and playtesting, I have legitimately forgotten what happens to your spells upon Reincarnation.
When you die, you lose all of your equipment and items. When you reincarnate into a different Vessel, you receive bonus starting cash based on your Reincarnation Count. For Checkpoint A1, for instance, this is Reincarnation Count x $250. If you reincarnate into the SAME Vessel, you receive that bonus cash, plus ADDITIONAL bonus cash based on your level. For Checkpoint A1, for instance, you receive ADD'L bonus cash equal to your Level x $250. So reincarnating into the same Vessel (say a Level 10 Academic) at Checkpoint A1 with say 2 Reincarnations under your belt, you should have bonus cash of $3000 ($250 x 2 Reincarnations + $250 x 10 Levels). This money can be spent at the Bazaar to get you closer to the power level you were at before you died, but also lets you experiment with new items and equipment.
HOW LOOT POINTS AND REINCARNATION ARE SUPPOSED TO INTERACT
Any loot you collect from an area in the same Investigation will NOT respawn when returning to that Investigation (irrespective of Vessel). This is by design. Instead, depending on your Reincarnation Count and some other hidden factors, new, weirder, and better loot may spawn in the previous areas. This is meant to enhance replay value, a concept I think comes into play in EREWHON well before you actually clear the game.
So zutsu13, what this boils down to is that the answer to your issues with feeling naked and underpowered upon Reincarnating as the Academic on 2F can be rendered in a single word: Bazaar!. You should have noticed that you Reincarnated with a fair bit of cash to a TON of cash depending on your level. You also should have some of the items Malphus will take to open a portal to the Bazaar in your inventory, if you are the Academic (didn't give the Occultist this grace, I think, because he can MAKE those items). Even if not, I believe that when you Reincarnate to this checkpoint, Gabrielle's equipped weapon will also pay for opening the portal. So, go through the portal to the Bazaar, and gear up. (Don't accept the Mad Arab's gift lightly, should it be offered.)
Unless of course there's another bug that I didn't see on my last pre-alpha playtesting runs: always a very real possibility!
So, the complexity inherent in being able to switch bodies and campaigns each and every time you die, in any order, was, besides wanting some validation and a motivation boost after working my ass off on this for a year, the primary pressure that lead me to pushing this into Public Alpha. The sheer NUMBER of possible permutations and variables (what you do in each campaign as each character and in what order) is IMMENSE and in spite of a herculean effort to be thorough, I don't think it's physically possible for me as a single, solo human playtester to encounter everything that can go wrong. And of course, if and when I resume active development and start finishing Investigation B, that will exacerbate the "too many combinations of deaths/checkpoints/reincarnations to playtest" problem considerably.
The Reincarnation behavior is VERY idiosyncratic, so I should spell out how it's supposed to behave. I'm going to focus on
HOW CHECKPOINTS ARE SUPPOSED TO WORK:
Once you've been to CHECKPOINT A1 (EXEUNT THRESHOLD to PARLOR in the Dining Hall of Asylum 1F), when you reincarnate as the Vessel who reached that checkpoint (whether it's the Academic or the Occultist) you will start at that Checkpoint. If you've reached the Checkpoint as the Academic but not the Occultist, for instance, and reincarnate as the Occultist, you will still start at the beginning (Weatherleigh Hotel South aka the start/tutorial area). When returning to this checkpoint, as a rule, anything you accomplished in Investigation A after the first time it was possible to enter this checkpoint will be undone. For instance, when reincarnating to this checkpoint as the Occultist, you will not have the Academic (Prof. Edward Farnsworth) in your party even if you rescued him from the 2nd Floor: you'll need to go add him to your party again.
CHECKPOINT A2 is right at the beginning of Chapter 3, in the side passage going right from the connecting corridor to the Maximum Security ward: this is where you meet Vassago for the first time as the Academic, and is the EXEUNT point to the Blue Velvet Lounge. Again, once a Vessel (Academic or Occultist) has been to this checkpoint, they will start here when you reincarnate into them. And once again, any tasks completed/progress made will be reset to the state they were when you first could have reached this checkpoint (the start of Chapter 3).
SPECIAL NOTE: you don't actually need to enter this checkpoint through the door to activate it, if you have the CREATE GATE spell! If you cast CREATE GATE after reaching Chapter 3, it will zap you to this Checkpoint and unlock it if it hasn't already been unlocked.
CHECKPOINT A3 is the entrance to the Parlor through the Weatherleigh Hotel Bar in Weatherleigh Hotel East (accessible through the Blue Velvet Lounge after disabling the Magnetic Field Generator in the secret area behind the Maximum Security wing on Asylum 2F in Chapter 3) and follows the same rules/logic as the above. CHECKPOINT A4, the final checkpoint in Investigation A, is accessible towards the back of Ward J in Chapter 4.
HOW STAT/SKILL/EQUIPMENT PRESERVATION IS SUPPOSED TO WORK (For The Immortal Shadow)
When you die , you lose 1 level and most of your skills. When you Reincarnate, you gain +50 jp to spend for each level beyond your first. Your AP allotments should persist. HALF of any RESOLVE loss/INTELLECT gain from learning spells should persist (a last minute balance change was made to change this from all to half, because I got tired of Reincarnating in a new Vessel with a starting Resolve score of like 3 because I had stupidly learned like every spell possible as the last Vessel, and thought players would too). Skills learned from the Egyptian Pantheon should not be lost when you die and Reincarnate (if you bought Blessing of Bast through the Learn Skills menu, it will be lost, but if you received it from Bast herself in Egypt, you'll still have it).
When you die, you lose all of your equipment and items. When you reincarnate into a different Vessel, you receive bonus starting cash based on your Reincarnation Count. For Checkpoint A1, for instance, this is Reincarnation Count x $250. If you reincarnate into the SAME Vessel, you receive that bonus cash, plus ADDITIONAL bonus cash based on your level. For Checkpoint A1, for instance, you receive ADD'L bonus cash equal to your Level x $250. So reincarnating into the same Vessel (say a Level 10 Academic) at Checkpoint A1 with say 2 Reincarnations under your belt, you should have bonus cash of $3000 ($250 x 2 Reincarnations + $250 x 10 Levels). This money can be spent at the Bazaar to get you closer to the power level you were at before you died, but also lets you experiment with new items and equipment.
HOW LOOT POINTS AND REINCARNATION ARE SUPPOSED TO INTERACT
Any loot you collect from an area in the same Investigation will NOT respawn when returning to that Investigation (irrespective of Vessel). This is by design. Instead, depending on your Reincarnation Count and some other hidden factors, new, weirder, and better loot may spawn in the previous areas. This is meant to enhance replay value, a concept I think comes into play in EREWHON well before you actually clear the game.
Cool! Here is the INTENDED behavior for what happens to your stats, skills, levels, items, and gear upon death and Reincarnation.
HOW STAT/SKILL/EQUIPMENT PRESERVATION IS SUPPOSED TO WORK (For The Immortal Shadow)
When you die , you lose 1 level and most of your skills. When you Reincarnate, you gain +50 jp to spend for each level beyond your first. Your AP allotments should persist. HALF of any RESOLVE loss/INTELLECT gain from learning spells should persist (a last minute balance change was made to change this from all to half, because I got tired of Reincarnating in a new Vessel with a starting Resolve score of like 3 because I had stupidly learned like every spell possible as the last Vessel, and thought players would too). Skills learned from the Egyptian Pantheon should not be lost when you die and Reincarnate (if you bought Blessing of Bast through the Learn Skills menu, it will be lost, but if you received it from Bast herself in Egypt, you'll still have it).
When you die, you lose all of your equipment and items. When you reincarnate into a different Vessel, you receive bonus starting cash based on your Reincarnation Count. For Checkpoint A1, for instance, this is Reincarnation Count x $250. If you reincarnate into the SAME Vessel, you receive that bonus cash, plus ADDITIONAL bonus cash based on your level. For Checkpoint A1, for instance, you receive ADD'L bonus cash equal to your Level x $250. So reincarnating into the same Vessel (say a Level 10 Academic) at Checkpoint A1 with say 2 Reincarnations under your belt, you should have bonus cash of $3000 ($250 x 2 Reincarnations + $250 x 10 Levels). This money can be spent at the Bazaar to get you closer to the power level you were at before you died, but also lets you experiment with new items and equipment.
HOW LOOT POINTS AND REINCARNATION ARE SUPPOSED TO INTERACT
Any loot you collect from an area in the same Investigation will NOT respawn when returning to that Investigation (irrespective of Vessel). This is by design. Instead, depending on your Reincarnation Count and some other hidden factors, new, weirder, and better loot may spawn in the previous areas. This is meant to enhance replay value, a concept I think comes into play in EREWHON well before you actually clear the game.
So zutsu13, what this boils down to is that the answer to your issues with feeling naked and underpowered upon Reincarnating as the Academic on 2F can be rendered in a single word: Bazaar!. You should have noticed that you Reincarnated with a fair bit of cash to a TON of cash depending on your level. You also should have some of the items Malphus will take to open a portal to the Bazaar in your inventory, if you are the Academic (didn't give the Occultist this grace, I think, because he can MAKE those items). Even if not, I believe that when you Reincarnate to this checkpoint, Gabrielle's equipped weapon will also pay for opening the portal. So, go through the portal to the Bazaar, and gear up. (Don't accept the Mad Arab's gift lightly, should it be offered.)
Unless of course there's another bug that I didn't see on my last pre-alpha playtesting runs: always a very real possibility!
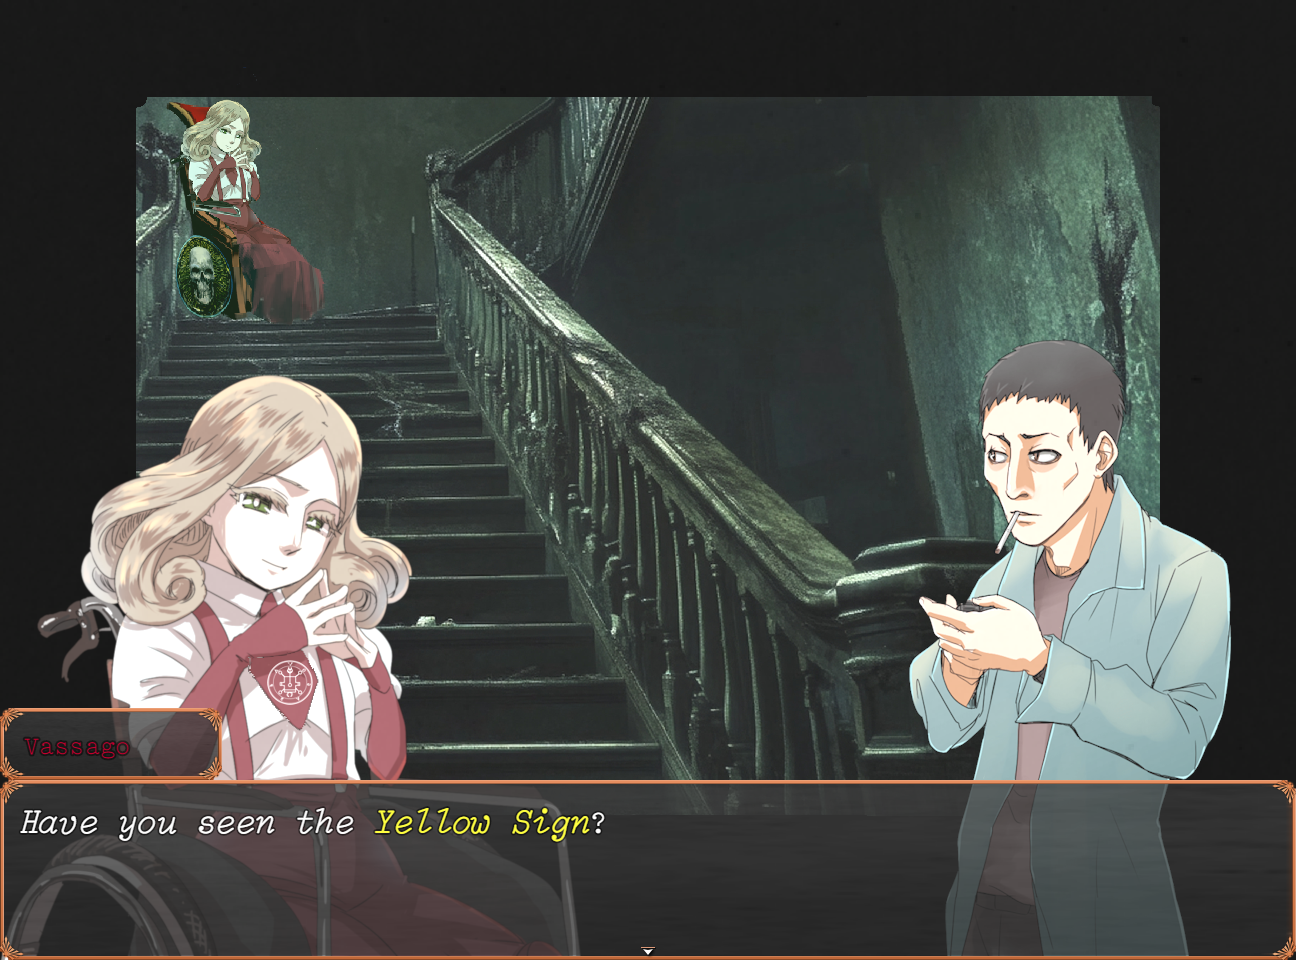
Let me know if the Twins keep being a nightmare and I can tell you the correct sequence of dialogue approaches in the "Social Combat" scene as the Academic to get them to not try to murder you. (As the Occultist, you can simply bypass fighting them if you have seen the Yellow Sign and tell them that you are "chill/down with Hastur, so to speak'....this approach might have SAN consequences.) Another tip hopefully not too obvious to be worth mentioning: you can and should absolutely heal and buff as best you can during the "Social Combat" sequence. As long as you take no direct aggressive action, this won't cause them to attack you. Well, more than they're already attacking you, I mean. The first phase of the combat (before they separate) is sort of both sides playing "kitten mittens": the Twins will buff, heal, and try to toss some status effects on you, but won't generally hit you for damage. If you reflect that strat during Social Combat, you'll be able to keep talking.
So one of the reasons I left the Twins encounter so tough, even though it's the first real boss fight of Investigation A, is that it's also, strictly speaking, an OPTIONAL boss fight, whether playing as the Academic or the Occultist, it is possible to talk them down.
So, creating this thread this was prompted by this recent feedback:
zutsu13
"The [MORGENSTERN TWINS'] silence song ended up hurting me quite a bit early on, but I just started lobbing all of the explosives I had. Sadly by the time they end up separating and getting serious they made short work of me before I could get one of them down to about 50%.
Which gave me a unique opportunity. I chose to restart in the same body.
Surprisingly this put me at the hotel's position in chapter 3 with almost none of my gear, not quite as many SP as I once had, and (most?) of my levels and stats. A nice surprise but...
The door is locked behind me and the enemies are absolutely brutal for the gear we have equipped.
I did notice I still have the manuscript to learn spells (hooray!), and the detectives started with different guns (including a nice shotgun).
Everyone missing a good chunk of active and passive skills at this point in the chapter because of a lack of SP definitely feels bad. You kind of have to sacrifice between active skill synergy or passives that you had before. And splitting up SP to get some passives and some active skills just leaves you a lot weaker and ill-prepared.
I was also hoping I could go back to earlier sections and pick up some of our previous gear - the academic in particular lost basically everything she was wearing. RIP my enchanted magic knife, amulet, and nifty Bast skill - but alas the door was locked behind us after we went through.
I wonder if picking the Occultist at this point would have also had different starting changes?
I may reload before the twin fight and see what happens next time I die, but I do need to talk to the nice woman in the wheelchair now that I've died to see what else she says."
Porting over the ongoing back-and-forth between Zutsu13 and myself from an older version of the game page:
zutsu13
I got out of the hotel into the asylum with both the psychologist and the occultist, but the difficulty bump is a bit insane with that one section, as it's possible to go in without weapons, up against some tough enemies.
I still have the save if you'd like me to send it to you.
I'm planning to play a bit more of it when I have time and try out other characters that I haven't gotten far with, and see how investigation B compares to A.
*Update*:
Got quite a bit farther in Investigation B in the graveyard. It definitely seems to be a bit easier than the second half of investigation A. Will try and advance some more when I have additional time.
The door at the bishop's house which the butler answers keeps opening up a prompt to use it even though there is conversation occurring after the butler retreats inside. May be because I was clicking on the door itself to try and advance conversation. I eventually got past it and was able to get quite a bit further.
Tabula Rasa Games
Thanks for the detailed feedback! Absolutely love to see it. Some kind souls, absolute saints (perhaps you're one of them) bought the game for a generous donation which is fantastic, but you're the first person engaging with it which is what I really need (if I can pick up momentum, I can swing my focus back to EREWHON and off of the new, TTRPG stuff I've been working on). I'll definitely work on talking about the game more places this week.
Anyway, I pretty deliberately left in the option to disarm (or not disarm) during the first chapter of Investigation A as kind of a teachable moment: yes, it is VERY hard (not impossible) to survive there if you decide to have your investigators surrender their weapons, it's kind of meant to teach that this is a world where you uh... don't want to be trusting enough to do that. (There is a moment MUCH later in that Investigation that kind of tests if you learned this lesson the first time around lol.)
I think I agree with your assessment that Investigation B is a bit easier on the whole. Certainly, more of your problems are solvable by standard physical violence/explosives than during Investigation A, where you are constantly stalked by an enemy that is immune to physical attacks and weapons. As for Investigation A, the Occultist really is kind of the "easy" mode to the Academic's "hard mode". While somewhat fragile to physical attacks, the Occultist starts with a very robust toolset for confronting the unnatural. Including a shotgun, which kicks ass as a starting weapon.
zutsu13
The basement in investigation A as the academic is absolutely killing me.
I got past the amoeba easily enough after one retry.
I even spent some time farming levels / skills on the upper levels once I got access to the hotel. But it seems like everything has far more health down there - even though I have my academic set up with decent dex / int and supporting skills like bless weapon, a rapier, and decent equipment on my other two characters - we just take too long to kill things. Using therapy in combat to try and stave it off really just makes the death spiral start sooner.
My in combat sanity restoration items are limited enough that I can never end the fights before someone goes insane, and the permanent sanity reduction makes the loop even more punishing.
I may need to just farm money and buy a bunch of alcohol at the hotel to be able to continue. Items seem a lot more scarce in the asylum compared to the amount of things you find in Investigation B.
Tabula Rasa Games
Yeah the uh...the Asylum basement is kinda fucking brutal, a real trial by fire. Especially for the academic. This isn't at all you needing to get gud, the game definitely need rebalancing, I just need some more data points before diving in. I know it needs to be tuned down, I just can't tell how much from a single data point. Okay, you specified the academic so I gotta make sure my advice for the CURRENT build is directed towards that:
If the core issue is taking too long to kill shit and thus going crazy in battle, DO NOT DRINK THE ALCOHOL YOU BUY, USE IT TO MAKE MOLOTOVS (perhaps this advice is also applicable to real life? lmfao).
(IIRC even if the Academic can't get the Incendiarism skill that lets you build molotovs, either Detective can.)
Your priority in the basement, unless you're against one of the encounters down there that is truly underwhelming (such as a single Reanimated, where you can save resources and just shoot/stab it) is to NUKE EVERYTHING. Molotovs are the cheapest way to burn everything in your path down there, but if you have the money or are willing to farm it (once you 've gained enough levels/gear that they become mostly a non-threat, the Pig Butchers/Porkies generally have the most lucrative drops, with a high tendency to drop cleavers, masks, and even leather trenchcoats) then the janitor can and will sell you an unlimited amount of dynamite and/or grenades. (I actually removed Molotovs from all in-game stores in a balancing pass because I could not find any price point for them where you couldn't break the game by buying a shit ton, which was one of the reasons, but not the only reason, I made them craftable (and craftable only). rather than buyable).
Spot check (and I've decided even if for a while my only playtester is just you, I'm sitll goingt o start a proper forum on this page and create dedicated playtesting threads there with relevant info, as you've been incredibly dilligent and I'm extremely grateful) what is your Permanent Insanity level at?
zutsu13
Thank you so much for the tips!
I somehow have managed to miss the janitor entirely (unless they are also in the basement). Once I do find them I should have piles of cash, because of how much gear I've collected from grinding the first couple of areas in the asylum.
Right now my permanent insanity is at II. I've been save scumming to avoid having it go up too high. However, on a previous play through it was at IV, and yeah I basically had to pump resolve every level to even be functional.
I have yet to discover how to visit Egypt, but I did see there was a learnable Bastet occult skill. I may just grind out SP and get a few more things to help out.
Finding the janitor is a must though, because I've run out of cloth to make molotovs with, despite stocking up on piles of alcohol. Unless there's a way to tear down clothing I've missed, that would solve that problem.
Update: I got the Minotaur to 0% with some grenades and dynamite i found and he didn't die :(
Also I found the janitor. I could have sworn I checked in this room, but apparently I missed it.
Update 2: Finding the janitor has given me a massive power boost considering all the equipment he has access to. I've finally been able to make significant progress (Who knew star vampires were weak to being shot in the head with an SKS?).
Tabula Rasa Games
"Also I found the janitor. I could have sworn I checked in this room, but apparently I missed it. "
Unless things are profoundly bugged in a way completely undetectable to my own playtesting thus far (ALWAYS POSSIBLE), the Janitor is in the room if you go straight ahead as soon as you enter the asylum as the Academic. He can also be found in the basement later on. In Investigation B, on the other hand, he can first be found at Bellevue, and then can be found outside the Mausoleum in the Cemetery, and once the Cemetery is alerted, he moves in Investigation B.
In Investigation A his appearance in the basement shouldn't be contingent on first having met him in the room straight across from the entrance on the first floor, and Investigation B his appearance outside or inside the Mausoleum shouldn't be dependent on having first met him in Bellevue. I tried to make him very, very hard to miss. Additionally, worth checking back with him as you progress, as his inventory gets updated periodically with more and better gear and items.
Also, in Investigation A he does get very pissy if you find his quarters in the southwest section of the asylum and take his .30-06 rifle off of his wall. This can effect his future inventory, depending on how you handle it when you talk to him.
"Update: I got the Minotaur to 0% with some grenades and dynamite i found and he didn't die :("
I have killed the minotaur a dozen times now and I have never seen him fail to die from being killed! I have no idea what is going on here, but I will try to look into it. I probably have a savegame somewhere nearby I can load in the basement and I can tweak the chance of him appearing to see if I can reproduce this bug. There is an 'Immortal' state flag sometimes added to certain enemies so they don't actually die at 0 HP, but I never used this on the Minotaur.
As to save scumming to preserve your sanity, try to limit that instinct! There is actually a fair bit of cool later game content that you can only access if you are crazy enough. It's not obvious at first, but permanent madness can have niche benefits, particular once you reach the other side of Asylum 2F and meet Vassago, Malphus, and Andras (the middle of these is your gateway to Egypt through Investigation A). Generally speaking, permanent insanity of less than 4 is pretty manageable, and even 4 is survivable depending on how you spec. (Indefinite Insanity 5 is a very precarious state: at that point you really do want to get to Egypt and Bast as fast as possible.)
Glad you're progressing, and big thanks for the updates!
zutsu13
Oh yes, the minotaur was very strange. Got him down to 0%.
He spent a few rounds after that on fire, bleeding, and stunned while I attacked him. Still didn't die after the stun wore off and a full round passed. At that point I had to run away, because he can easily one shot the academic and possibly get lucky enough to take one of the detectives down at the same time. If I have more time to play today, I'll try it again to see if I can reproduce the issue. Maybe something has changed since I was able to flee and go back to the hotel.
*Update*
Attempted it again. He finally died after about three rounds of everyone going insane and punching about randomly while at 0%.
I guess I was just too hasty with my retreat earlier.
Also the blessing of Bast is my favorite thing. Love cats <3
zutsu13
Finally made it to the trio and got to try out Egypt.
I also tried to go to 1892. She took the LeMat revolver from me but then nothing happened. If the whole Egypt trip never happened I'd feel ripped off! :P
Very excited to see where things go next.
...
After getting insanity to IV thanks to looking at the Yellow Sign and spending a good amount of time going through options provided by the trio (Including finally visiting Bast once my insanity hit level V) I moved on and got to the confrontation with the Morgenstine twins, but ended up failing the conversation portion.
It was a close fight after they split, but they ended up killing me (first death on this save).
...
On another note, I enjoy the spell learning process out of the manuscript. It's really well done.
Also the twins themselves are great, as much as I complain about them being very difficult. The whole encounter just oozes the right kind of atmosphere for the king in yellow. "
ZUTSU13:
Got quite a bit farther in Investigation B in the graveyard. It definitely seems to be a bit easier than the second half of investigation A. Will try and advance some more when I have additional time.
The door at the bishop's house which the butler answers keeps opening up a prompt to use it even though there is conversation occurring after the butler retreats inside. May be because I was clicking on the door itself to try and advance conversation. I eventually got past it and was able to get quite a bit further.
Tabula Rasa Games
QUICK EDIT (missed this!): "The door at the bishop's house which the butler answers keeps opening up a prompt to use it even though there is conversation occurring after the butler retreats inside. May be because I was clicking on the door itself to try and advance conversation. I eventually got past it and was able to get quite a bit further. "
Yes, this is unfortunately a known issue with the plugin that I use to make on-screen pictures that RPG Maker can display "clickable" which unfortunately isn't a native feature to the engine (in general, I've had to jump through several hoops to achieve the point-and-click functionality I do have in the game). This plugin can't seem to recognize that other event code is running when it checks to see if a picture is being clicked, and it's also a bit overzealous in its efforts to identify the latter so yeah, what I do playtesting that specific bit is click the door once, put my mouse way out of the way, and let the scene play out. Sorry about that, but this one is currently flagged as "known about but idk how 2 fix".
ZUTSU13:
Is Chapter 3.(B) a dead end at this point in the alpha? I got the chapter title to display but can't seem to do anything except go one screen forward and fight the Lamprey once I go into the Warrens. At that point I appear to stuck as there is no exit or way to backtrack.
Anecdotally there were a lot less bugs that I encountered in Investigation B so far. Everything seemed well polished and laid out with a nice assortment of supplies that kept my party going before I could get back to the hotel.
I really liked the themes here and the enemy variety. Combat felt tense and very resource draining, but not insurmountable with the shotgun and a later secret weapon you pick up from a certain room. I may just be bad at building the Rogue, but it felt like her knife skills really couldn't keep up in damage with basic attacks from other characters. This was ok, because she definitely had other benefits. The amount of extra items you can acquire with Vivienne in your party is great, so she doesn't need to excel at everything.
I finally got to try out a little bit of the crafting system. It worked well, and molotov cocktails are a bit OP if the initial hit doesn't miss. They definitely saved my investigators more than a few times.
The boss fight here was great, and I enjoyed the world building with how Vivienne knew who this guy was. He also seemingly comes back at some point, but I ran away before seeing if it would trigger another fight.
The amount of keys you pick up was a bit confusing at first, but since you can brute force what door they go to by looking for the icon change, finding my way around was manageable.
Loved all the 'evidence' you collect to bust the family running the graveyard, but haven't figured out if there's anything else you can do with it.
Overall, really loving my time with this game, and it's clear you put a lot of work and love into it. I'll definitely revisit Investigation A and see if I can make my past the problem spots with a bit more planning.
I'm also a huge fan of the music! Very darksynth and gets your blood pumping for combat, with old timey creepy pieces mixed in for exploration. I think it works great together but I have strange musical tastes according to my friends.
Tabula Rasa Games
Chapter 3: The Burrows Beneath is indeed where Investigation B ends in the current build. Content beyond that has not yet been created. Investigation A is complete and can be finished as both the Academic and the Occultist, with each having multiple endings. Thank you for following through with this excellent and useful and encouraging feedback. I'll have some more detailed thoughts later and edit this comment or make a new one. I'm multitasking hardcore right now.
zutsu13
4 days ago (edited)
Thank you so much for the tips!
I somehow have managed to miss the janitor entirely (unless they are also in the basement). Once I do find them I should have piles of cash, because of how much gear I've collected from grinding the first couple of areas in the asylum.
Right now my permanent insanity is at II. I've been save scumming to avoid having it go up too high. However, on a previous play through it was at IV, and yeah I basically had to pump resolve every level to even be functional.
I have yet to discover how to visit Egypt, but I did see there was a learnable Bastet occult skill. I may just grind out SP and get a few more things to help out.
Finding the janitor is a must though, because I've run out of cloth to make molotovs with, despite stocking up on piles of alcohol. Unless there's a way to tear down clothing I've missed, that would solve that problem.
Update: I got the Minotaur to 0% with some grenades and dynamite i found and he didn't die :(
Also I found the janitor. I could have sworn I checked in this room, but apparently I missed it.
Update 2: Finding the janitor has given me a massive power boost considering all the equipment he has access to. I've finally been able to make significant progress (Who knew star vampires were weak to being shot in the head with an SKS?).
Tabula Rasa Games
3 days ago
"Also I found the janitor. I could have sworn I checked in this room, but apparently I missed it. "
Unless things are profoundly bugged in a way completely undetectable to my own playtesting thus far (ALWAYS POSSIBLE), the Janitor is in the room if you go straight ahead as soon as you enter the asylum as the Academic. He can also be found in the basement later on. In Investigation B, on the other hand, he can first be found at Bellevue, and then can be found outside the Mausoleum in the Cemetery, and once the Cemetery is alerted, he moves in Investigation B.
In Investigation A his appearance in the basement shouldn't be contingent on first having met him in the room straight across from the entrance on the first floor, and Investigation B his appearance outside or inside the Mausoleum shouldn't be dependent on having first met him in Bellevue. I tried to make him very, very hard to miss. Additionally, worth checking back with him as you progress, as his inventory gets updated periodically with more and better gear and items.
Also, in Investigation A he does get very pissy if you find his quarters in the southwest section of the asylum and take his .30-06 rifle off of his wall. This can effect his future inventory, depending on how you handle it when you talk to him.
"Update: I got the Minotaur to 0% with some grenades and dynamite i found and he didn't die :("
I have killed the minotaur a dozen times now and I have never seen him fail to die from being killed! I have no idea what is going on here, but I will try to look into it. I probably have a savegame somewhere nearby I can load in the basement and I can tweak the chance of him appearing to see if I can reproduce this bug. There is an 'Immortal' state flag sometimes added to certain enemies so they don't actually die at 0 HP, but I never used this on the Minotaur.
As to save scumming to preserve your sanity, try to limit that instinct! There is actually a fair bit of cool later game content that you can only access if you are crazy enough. It's not obvious at first, but permanent madness can have niche benefits, particular once you reach the other side of Asylum 2F and meet Vassago, Malphus, and Andras (the middle of these is your gateway to Egypt through Investigation A). Generally speaking, permanent insanity of less than 4 is pretty manageable, and even 4 is survivable depending on how you spec. (Indefinite Insanity 5 is a very precarious state: at that point you really do want to get to Egypt and Bast as fast as possible.)
Glad you're progressing, and big thanks for the updates!
zutsu13
3 days ago(edited)
Oh yes, the minotaur was very strange. Got him down to 0%.
He spent a few rounds after that on fire, bleeding, and stunned while I attacked him. Still didn't die after the stun wore off and a full round passed. At that point I had to run away, because he can easily one shot the academic and possibly get lucky enough to take one of the detectives down at the same time. If I have more time to play today, I'll try it again to see if I can reproduce the issue. Maybe something has changed since I was able to flee and go back to the hotel.
*Update*
Attempted it again. He finally died after about three rounds of everyone going insane and punching about randomly while at 0%.
I guess I was just too hasty with my retreat earlier.
Also the blessing of Bast is my favorite thing. Love cats <3
zutsu13
3 days ago
Finally made it to the trio and got to try out Egypt.
I also tried to go to 1892. She took the LeMat revolver from me but then nothing happened. If the whole Egypt trip never happened I'd feel ripped off! :P
Very excited to see where things go next.
zutsu13
3 days ago (edited)
Ran into a missing file issue when examining one of the paintings. The itch comments are being ornery and don't want to allow me to upload a screenshot. It's the Rosa Temptation painting in the room with the trio.
Notably this is before you open a portal that takes the inspection button's place.
zutsu13
3 days ago
After getting insanity to IV thanks to looking at the Yellow Sign and spending a good amount of time going through options provided by the trio (Including finally visiting Bast once my insanity hit level V) I moved on and got to the confrontation with the Morgenstine twins, but ended up failing the conversation portion.
It was a close fight after they split, but they ended up killing me (first death on this save).
The silence song ended up hurting me quite a bit early on, but I just started lobbing all of the explosives I had. Sadly by the time they end up separating and getting serious they made short work of me before I could get one of them down to about 50%.
Which gave me a unique opportunity. I chose to restart in the same body.
Surprisingly this put me at the hotel's position in chapter 3 with almost none of my gear, not quite as many SP as I once had, and (most?) of my levels and stats. A nice surprise but...
The door is locked behind me and the enemies are absolutely brutal for the gear we have equipped.
I did notice I still have the manuscript to learn spells (hooray!), and the detectives started with different guns (including a nice shotgun).
Everyone missing a good chunk of active and passive skills at this point in the chapter because of a lack of SP definitely feels bad. You kind of have to sacrifice between active skill synergy or passives that you had before. And splitting up SP to get some passives and some active skills just leaves you a lot weaker and ill-prepared.
I was also hoping I could go back to earlier sections and pick up some of our previous gear - the academic in particular lost basically everything she was wearing. RIP my enchanted magic knife, amulet, and nifty Bast skill - but alas the door was locked behind us after we went through.
I wonder if picking the Occultist at this point would have also had different starting changes?
I may reload before the twin fight and see what happens next time I die, but I do need to talk to the nice woman in the wheelchair now that I've died to see what else she says.
On another note, I enjoy the spell learning process out of the manuscript. It's really well done.
Also the twins themselves are great, as much as I complain about them being very difficult. The whole encounter just oozes the right kind of atmosphere for the king in yellow. "
I'll also paste the relevant ones into the relevant Playtesting Threads.
Yes, I will now manually fetch them (itch.io doesn't DELETE the comments you had when you switch from 'Single Comment Thread' mode to 'Forums' mode, but it does hide them until you switch back).
Here's all of them in one big blob:
Hi Tabula Rasa Games. Just wanted to thank you for advertising on reddit otherwise I never would have found this. I've only put about an hour into this game, but I'm absolutely loving it so far.
As a fan of all things lovecraftian this is basically my dream game. I love the premise of being able to switch between the different characters on death. And I appreciate that you provided two different character options for each archetype, both with slightly different backstories despite having the same equipment and statistics.
I'll try and leave a more detailed review up once I've got more of the game explored. But if you're on the fence about trying this, give it a shot.
It's name your own price so there's nothing to lose if you want to try it out before donating.
Tabula Rasa Games
9 days ago
Hey Zutsu! Thanks so much for playing and for your early thoughts. I think you might be my very first player. So very eager for your feedback as you proceed (the game gets pretty tough pretty fast, I think, in various compounding ways, once you're past the first couple hours, so where the difficulty curve is at is definitely one thing I need more data points on). Which subreddit did you see EREWHON on? I posted to a few.
Considering I worked on this more or less full time since early November of last year through about three weeks ago (~40 hours a week, discounting for May through July when I had a huge Crohn's flareup and was too ill to do anything), I really, really, really should be advertising it more. The cost sunk into development really demands I put more effort into promotion.
It's just that I LOVE making things only slightly more than I hate trying to sell the things I made, the former gives me pure joy and the latter undiluted anxiety. It is frankly ridiculous that I've been talking about this online for about 40 days now since the alpha launched and unless there's something I've missed you're the first human I've managed to persuade to play it. There are simply too many indiegames on the market, a market with nearly 0 entry barriers that's very crowded with both a lot of low-effort dross and a lot of great, creative, impressive stuff, and too few human eyeballs for even 10% of them to find an audience. Oh well, I need to advertise more, and I will advertise more, and finally getting some player engagement is great motivation. Please do keep going, and thanks again (didn't mean to vent at you, the main thing is, thanks for trying the game and your kind words).
zutsu13
9 days ago
(edited)
No worries! I think it was one of the call of cthulhu oriented subreddits, but I can't remember for sure .
It's honestly a crime that more people haven't played this. I left a review but I'm not sure they're posted publicly? The atmosphere and world building are very well done, and the difficulty reminds me a bit of Fear & Hunger, which I love.
I got out of the hotel into the asylum with both the psychologist and the occultist, but the difficulty bump is a bit insane with that one section, as it's possible to go in without weapons, up against some tough enemies.
I think there was a funny bug with the agents, when you get to the exit of the hotel there is no option to leave and if you go backwards you end up in a black void unable to move, so I purposefully reloaded a save and got myself killed.
However, when I switched characters one of the agents showed up in my party as a third character (Occultist, Agent, Rogue). There was also a test message I found in the asylum after I helped break the doctor out, but I died after running into three or four groups of cultists as I ran out of resources.
I still have the save if you'd like me to send it to you.
I love that you can customize characters by learning new skills with AP. There are still some mechanics I'm not sure about (crafting, how to learn new spells, and what the exact limit is for reincarnating - past a certain point it doesn't let you do anything but load a save when you die. I think after 5 spirals?) but overall I'm enjoying it a lot.
I'm planning to play a bit more of it when I have time and try out other characters that I haven't gotten far with, and see how investigation B compares to A.
If you'd like to pick my brain more I can send you my discord info.
*Update*:
Got quite a bit farther in Investigation B in the graveyard. It definitely seems to be a bit easier than the second half of investigation A. Will try and advance some more when I have additional time.
The door at the bishop's house which the butler answers keeps opening up a prompt to use it even though there is conversation occurring after the butler retreats inside. May be because I was clicking on the door itself to try and advance conversation. I eventually got past it and was able to get quite a bit further.
Tabula Rasa Games
8 days ago(edited)
Thanks for the detailed feedback! Absolutely love to see it. Some kind souls, absolute saints (perhaps you're one of them) bought the game for a generous donation which is fantastic, but you're the first person engaging with it which is what I really need (if I can pick up momentum, I can swing my focus back to EREWHON and off of the new, TTRPG stuff I've been working on). I'll definitely work on talking about the game more places this week.
Anyway, I pretty deliberately left in the option to disarm (or not disarm) during the first chapter of Investigation A as kind of a teachable moment: yes, it is VERY hard (not impossible) to survive there if you decide to have your investigators surrender their weapons, it's kind of meant to teach that this is a world where you uh... don't want to be trusting enough to do that. (There is a moment MUCH later in that Investigation that kind of tests if you learned this lesson the first time around lol.)
I think I agree with your assessment that Investigation B is a bit easier on the whole. Certainly, more of your problems are solvable by standard physical violence/explosives than during Investigation A, where you are constantly stalked by an enemy that is immune to physical attacks and weapons. As for Investigation A, the Occultist really is kind of the "easy" mode to the Academic's "hard mode". While somewhat fragile to physical attacks, the Occultist starts with a very robust toolset for confronting the unnatural. Including a shotgun, which kicks ass as a starting weapon.
Out of curiosity, which agent wound up in your party? Was it a named agent (Wintersen, you'll meet him later on in Investigation A...probably, it is possible to miss him if you have learned and cast a summon spell by that point, and happen to have a summon in your party as you pass through the area where he can be found, but that's generally an edge case) or one of the default PC agents? I have never seen this particular bug myself, and I'll try to follow your steps to reproduce it. (The potential for stuff like this is exactly why I'm so in need of playtesters. I am sure this game is bugged in a hundred ways I haven't personally seen yet. It is a borderline-absurdly complex game for a solo developer and has reached an epic scope in spite of being only about 50% content-complete overall.)
QUICK EDIT (missed this!): "The door at the bishop's house which the butler answers keeps opening up a prompt to use it even though there is conversation occurring after the butler retreats inside. May be because I was clicking on the door itself to try and advance conversation. I eventually got past it and was able to get quite a bit further. "
Yes, this is unfortunately a known issue with the plugin that I use to make on-screen pictures that RPG Maker can display "clickable" which unfortunately isn't a native feature to the engine (in general, I've had to jump through several hoops to achieve the point-and-click functionality I do have in the game). This plugin can't seem to recognize that other event code is running when it checks to see if a picture is being clicked, and it's also a bit overzealous in its efforts to identify the latter so yeah, what I do playtesting that specific bit is click the door once, put my mouse way out of the way, and let the scene play out. Sorry about that, but this one is currently flagged as "known about but idk how 2 fix".
zutsu13
8 days ago
(edited)
It's Quentin. After I had died on the agents, Quentin started in my party from the beginning of the cycle in the hotel. He was in the second party slot. Ryoko, Quentin, Vivienne.
I'll try to reproduce if I have time, but this was after three or four deaths and I had played the occultist once without Quentin being there.
I think my party choices went something like Occultist (Died to minotaur) -> Academic (Died to cultists) -> Agent (Purposefully died after getting stuck with no exit to hotel parking lot) -> Occultist.
I had just played the agents previously (female agent), died in combat because I couldn't get to the parking lot and going back into the hotel caused a black screen.
If the save file would help, I can upload it somewhere for you to nab.
zutsu13
7 days ago(edited)
Is Chapter 3.(B) a dead end at this point in the alpha? I got the chapter title to display but can't seem to do anything except go one screen forward and fight the Lamprey once I go into the Warrens. At that point I appear to stuck as there is no exit or way to backtrack.
Anecdotally there were a lot less bugs that I encountered in Investigation B so far. Everything seemed well polished and laid out with a nice assortment of supplies that kept my party going before I could get back to the hotel.
I really liked the themes here and the enemy variety. Combat felt tense and very resource draining, but not insurmountable with the shotgun and a later secret weapon you pick up from a certain room. I may just be bad at building the Rogue, but it felt like her knife skills really couldn't keep up in damage with basic attacks from other characters. This was ok, because she definitely had other benefits. The amount of extra items you can acquire with Vivienne in your party is great, so she doesn't need to excel at everything.
I finally got to try out a little bit of the crafting system. It worked well, and molotov cocktails are a bit OP if the initial hit doesn't miss. They definitely saved my investigators more than a few times.
The boss fight here was great, and I enjoyed the world building with how Vivienne knew who this guy was. He also seemingly comes back at some point, but I ran away before seeing if it would trigger another fight.
The amount of keys you pick up was a bit confusing at first, but since you can brute force what door they go to by looking for the icon change, finding my way around was manageable.
Loved all the 'evidence' you collect to bust the family running the graveyard, but haven't figured out if there's anything else you can do with it.
Overall, really loving my time with this game, and it's clear you put a lot of work and love into it. I'll definitely revisit Investigation A and see if I can make my past the problem spots with a bit more planning.
I'm also a huge fan of the music! Very darksynth and gets your blood pumping for combat, with old timey creepy pieces mixed in for exploration. I think it works great together but I have strange musical tastes according to my friends.
Tabula Rasa Games
6 days ago
Chapter 3: The Burrows Beneath is indeed where Investigation B ends in the current build. Content beyond that has not yet been created. Investigation A is complete and can be finished as both the Academic and the Occultist, with each having multiple endings. Thank you for following through with this excellent and useful and encouraging feedback. I'll have some more detailed thoughts later and edit this comment or make a new one. I'm multitasking hardcore right now.
"I may just be bad at building the Rogue, but it felt like her knife skills really couldn't keep up in damage with basic attacks from other characters. This was ok, because she definitely had other benefits. The amount of extra items you can acquire with Vivienne in your party is great, so she doesn't need to excel at everything. "
If you give Vivienne/Jack something like a rapier (shortsword might be the best you can do in the early game), estoc, wakizashi (the Twins, specifically Cassilda, almost always drop one) and devote a decent amount (30-50%) of AP to their Dexterity, she actually hits the hardest out of ANY character class, particularly with "Twin Strike" (hamstring cut's damage is underwhelming, vein slit is highly effective against creatures that care about keeping their delicious red blood inside their bodies, but super ineffective against creatures that don't have normal blood). Spec'd this way, the Rogue actually deals so much melee damage that it outpaces the Detectives' damage with the higher end firearms in the game! Of course, the Rogue can also use pistols out the gate, and can buy Rifle Proficiency, so that's another way to go.
zutsu13
6 days ago
Aha, I knew the skills I was picking for her probably contributed to part of her low damage.
That makes a lot of sense. I'll keep an eye out for those better melee weapons next time, though I think I'll try and get through Investigation A with the Academic first.
Tabula Rasa Games
6 days ago
oh man, this is so unprofessional of me, but I must ask:
a) did I have the (extremely extremely extremely partial, it's only the Concierge in the initial Parlour scenes) voice acting turned on for this release? I honestly cannot remember.
b) was it unbearable?
zutsu13
6 days ago(edited)
You did! I actually enjoyed it. Helped set the atmosphere. Was a very pleasant surprise as I wasn't expecting any voice acting at all.
Tabula Rasa Games
4 days ago
very happy to hear it. even in the absence of any other voice actors/voice acting, in the final game, The Concierge and Stanislaw Grabinski will each be voiced by yours truly.
zutsu13
5 days ago
The basement in investigation A as the academic is absolutely killing me.
I got past the amoeba easily enough after one retry.
I even spent some time farming levels / skills on the upper levels once I got access to the hotel. But it seems like everything has far more health down there - even though I have my academic set up with decent dex / int and supporting skills like bless weapon, a rapier, and decent equipment on my other two characters - we just take too long to kill things. Using therapy in combat to try and stave it off really just makes the death spiral start sooner.
My in combat sanity restoration items are limited enough that I can never end the fights before someone goes insane, and the permanent sanity reduction makes the loop even more punishing.
I may need to just farm money and buy a bunch of alcohol at the hotel to be able to continue. Items seem a lot more scarce in the asylum compared to the amount of things you find in Investigation B.
Tabula Rasa Games
4 days ago(edited)
Yeah the uh...the Asylum basement is kinda fucking brutal, a real trial by fire. Especially for the academic. This isn't at all you needing to get gud, the game definitely need rebalancing, I just need some more data points before diving in. I know it needs to be tuned down, I just can't tell how much from a single data point. Okay, you specified the academic so I gotta make sure my advice for the CURRENT build is directed towards that:
If the core issue is taking too long to kill shit and thus going crazy in battle, DO NOT DRINK THE ALCOHOL YOU BUY, USE IT TO MAKE MOLOTOVS (perhaps this advice is also applicable to real life? lmfao).
(IIRC even if the Academic can't get the Incendiarism skill that lets you build molotovs, either Detective can.)
Your priority in the basement, unless you're against one of the encounters down there that is truly underwhelming (such as a single Reanimated, where you can save resources and just shoot/stab it) is to NUKE EVERYTHING. Molotovs are the cheapest way to burn everything in your path down there, but if you have the money or are willing to farm it (once you 've gained enough levels/gear that they become mostly a non-threat, the Pig Butchers/Porkies generally have the most lucrative drops, with a high tendency to drop cleavers, masks, and even leather trenchcoats) then the janitor can and will sell you an unlimited amount of dynamite and/or grenades. (I actually removed Molotovs from all in-game stores in a balancing pass because I could not find any price point for them where you couldn't break the game by buying a shit ton, which was one of the reasons, but not the only reason, I made them craftable (and craftable only). rather than buyable).
Do not attempt psych triage in combat. Keep throwing bombs as long as you're able, and patch up your SAN and Health between encounters.
To save money on booze+bandages for making molotovs and dynamite/grenades: the double-barreled shotgun is your friend, as long as you don't forge to reload it. It's cheap, either detective can rock it, and while it's not quite as good in the context of this game as Doom II's super shotgun...it comes close.
ALTERNATE APPROACH: not sure if you got past the Basement as the Occultist or not, but the Occultist has access to both Wheel of Eibon and the ability to make Ointment of Suleiman, which can both prevent non-boss encounters while exploring, which is extremely helpful. The academic can also find some Ointments, but is unlikely to find any before the basement, barring a very lucky random loot drop (most of the lootable objects are in fact giving random drops from an extensive leveled table, though some are fixed).
Spot check (and I've decided even if for a while my only playtester is just you, I'm sitll goingt o start a proper forum on this page and create dedicated playtesting threads there with relevant info, as you've been incredibly dilligent and I'm extremely grateful) what is your Permanent Insanity level at? If you have Level 4 or higher permanent madness, your best option is to visit Egypt ASAP and seek out Bastet even if it means intentionally dying and reincarnating into Investigation B. 4 or higher levels of permanent or crazy makes it VERY difficult to keep your MC (Immortal Shadow/yourname) functional unless you invest very heavily in boosting their Resolve through both AP spends and equipment choices.
Good catch! As to this (deeply stupid) behavior when a missing file is encountered, that is unfortunately inherent to the engine. As to the specific missing file, I have no idea how it got left out of the current build! Or how I didn't notice it missing in my last run of playtesting. Weirdly, on my end, it's like it never existed, it's not even in any of the backups I made, all of which I playtested, clicking on the painting (I thought) each time out of habit. Anyway, here's the missing file:

Pop this into wherever you have the game folder at on your machine/www/img/picture and it SHOULD fix the issue. Let me know. Thanks!
In other news, have you attracted the attention of the Hounds yet?
itch.io Community » General » Release Announcements · Created a new topic EREWHON - DON'T GO IN THE BASEMENT! PUBLIC ALPHA NEEDS PLAYTESTERS (first-person turn-based Lovecraftian horror dungeon-crawler w/ VN & Soulslike elements; solo-dev'd over a year))
EREWHON is my solo-developed first-person, turn-based Lovecraftian horror dungeon crawler. For #TrailerTuesday here is the latest video from it.
A free playable alpha of EREWHON with well over 20 hours of gameplay is currently available right here on ichio.
(I'm being told it's impressively polished for a public alpha from an RPG Maker solo dev.)
The game at this point is huge, epic even. The thousand hours or more I've spent playtesting it just won't be adequate or sustainable going forward: there is too much going on, and too many permutations and variables at play, for me to reliably find all or even most of the bugs and balance issues. Which is to say I need more playtesters, so if this interests you, please hit me up over here or click that link to get your free game and "report" for playtesting "duty".
Full game description (copied from the game's page) follows for those who wish to know more:
In EREWHON, guided by the Weatherleigh's Concierge, you choose a Vessel to inhabit, (initially) given a choice of The Academic, The Detective, The Occultist, and The Rogue, joining them in the year 1982 in the "real world", if such a thing even exists.
FEATURE LIST
- "Death Is Not The End...": Each time your Vessel dies, you return to The Parlor of the Weatherleigh Hotel, where you may choose to return to the Vessel which just perished, or inhabit a new Vessel and see their side of the story. The more you die and resurrect, the more avenues of the intersecting stories you can explore, and new encounters, opportunities, challenges and items as you navigate interlocking campaigns and interact with the same characters from different perspectives in a unique branching meta-campaign, with each 10-12 hour investigation having multiple endings based on your choices.
- "...But Madness Might Be": However, while your body is replaceable, your mind is vulnerable, and terrifying events and inexplicable horrors erode your sanity, with permanent insanity carried over between reincarnations. When you lose what's left of your mind, the Wandering Psyche's journey is at an end.
- An Exquisite Atmosphere Of Eldritch Doom: Explore haunting and immersive environments (an insane asylum with a sinister history, a cemetery where horrors dwell beneath the grave soil, a haunted hotel transcending time and space, and more) brought to life by rich lighting effects and meticulously designed ambient soundscapes. The mood is completed by a killer soundtrack with diverse tracks ranging all the way from dark synthwave emblematic of 1980s horror through psychedelic folk rock to vintage 1920s blues and jazz.
- A Menagerie Of Horrors: A wide array of sinister foes, some of them even human, threaten not just your life but your sanity. As you combat them with a wide array of weapons, skills, and spells, you will find that some encounters provide entirely different choices from direct, full-on combat.
- Deep And Broad Character Progression: As you gain levels, customize your characters by spending your AP on your six attributes, unlock class skills and passive abilities in the order you choose, and choose from dozens and dozens of melee weapons, firearms, enchanted weapons and weird artifacts to wield in your struggle for survival. Use what you find in the environment to craft everything from molotov cocktails to weird alchemical concoctions.
- Access Arcane Powers At The Cost Of Your Sanity: As you find Eldritch Tomes and unlock the ability to learn dramatically powerful Mythos Spells and summon and bind unnatural abominations to serve you, you must balance the abilities gained thereby with the disintegration of your sanity that comes from wielding such Forbidden Magicks.
- Creature Comforts And Bad Habits: Restore your health, power, and Sanity by using dozens of consumables, including alcohol, cigarettes, drugs, medical supplies, and even fine food and haute cuisine, balancing the complex benefits and drawbacks of all of the above.
This is meant as a repository for receiving and processing all playtest feedback related to Investigation B: True Dark. This is the Investigation you progress through by playing as The Detective or The Rogue. In order to start Investigation B, enter one of those Vessels at the Parlor, either at the start of the game or after dying as another Vessel.
Investigation B is only 40% complete in the current build. The Investigation ends when you see the title card for Chapter 3 (B). The Burrowers Beneath. There should still be approximately six hours of gameplay (per class) in Investigation B to enjoy and/or find bugs in.
Some general tips for Investigation B:
- Your first opportunity to meet the Janitor as either Detective or Rogue is at Bellevue after leaving the Weatherleigh Hotel but before proceeding to Stanton Street Cemetery. The Janitor sells a wide range of useful weapons, gear, and items you'll probably need to survive. If you miss him at Bellevue, don't worry about it. He can be found in the cemetery either outside the Mausoleum doors early on, or inside the Mausoleum at the back later when the Cemetery goes on alert.
- Once you arrive at the cemetery, your actions will determine when and how the Cemetery goes on alert and becomes a hostile environment. The Detective will eventually wind up alerting the...people and things that aren't fans of you...around the cemetery before too long. The Rogue on the other hand has the capacity to complete Investigation B without ever alerting the Cemetery (although you'll still have hostile encounters inside the Bishop House itself, and in the mortuary level beneath it). But this depends entirely on your approach. You can be very subtle and methodical and avoid alerting the Cemetery, or you can be... less subtle and start getting into trouble earlier.
- The first (and I believe effectively only) Checkpoint that saves your progress in Investigation B is the EXEUNT THRESHOLD to the Parlor on the second floor of the Bishop House. To avoid progress lost, try to get here as quickly as possible (certainly, before exploring the basement).
- The encounter with Cassandra Bishop in the library can go a MULTITUDE of different ways depending both on the Vessel you are in AND the choices you make during the discussion. I recommend seeing a few of the ways it can go: if you clear what there is of Investigation B as the Detective and the Rogue, that will let you see at least two of the ways it can go, but reloading is also an option.
- It is in fact possible to meet Cassandra again in the Weatherleigh Hotel Bar in the second half/last third of Investigation A. She may or may not remember you from encountering you in her previous vessel. This isn't important, nor is it even an Investigation B THING per se, I just thought you might find it interesting.
Please share feedback and bug reports related to Investigation B here!