🔒 EXCLUSIVE: Search/label/wire - High Quality

Showing posts with label wire. Show all posts

Friday, July 7, 2017

Welcome Guest Artist: Nealay Patel

Today we welcome innovative designer, prolific author and charming instructor Nealay Patel. Nealay is an artist who crafts in beads and fiber to produce jewelry designs that are striking, colorful and textured. He is a problem-solver who sees his designs as solving a puzzle. His intricate jewelry is always highly textural and full of life, using a mix of metal and fiber and beads and wire. He has authored three books: Jewelry for the New Romantic, Jewelry Designs with Knitted Wire, and his most recent, Jewelry Made with Wire & Fiber. Recently, Nealay has started doing monthly Live Facebook videos featuring a kit that he sells on his Etsy site. Nealay was kind enough to share a project featuring an art bead with us.

 ~~~~~~~~~~~~~~~~~~~~~~~~~~~~~~

The power of a single pendant

How rare is it to come across an amazing pendant that works with just about anything? I asked a bead artisan and glass expert friend of mine to assemble a special pendant for me with just one word in mind…dagger.

Open to interpretation and inspired by the challenge, Scott Griffin of Griffin Glass sent over this wonderful pendant and I have to say, he deserves a gold star!

It was my turn for the challenge next and I didn’t know exactly what to do with it at first, I have to admit. I knew I loved it simply by itself! So, why clutter up a fabulous pendant with beadwork, right?


I threw out a few chains and cords onto the table and the fiber cord spoke to me the most! The detailed, black and white cord worked perfect to set the backdrop for this star! I added some minor embellishments on either side, a technique that can be found in my latest book, Jewelry Made with Wire & Fiber.


I also had this fabulous wire collar, from Halstead Beads, that worked amazingly with the pendant! I love the bright silver, un-textured collar that contrasts with the very textured pendant.

A perfect combo for the fashion forward! Give it a try!


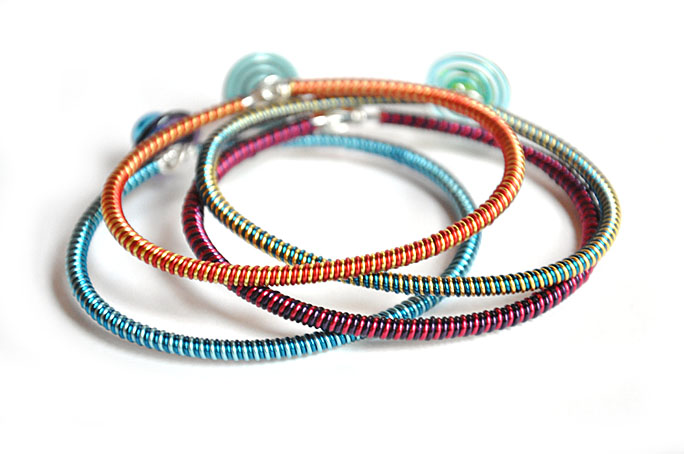
Be sure to stop by Nealay's Beads & Bubbles Facebook page and mark your calendars to watch his next video on Wednesday, July 26th for the In Bloom Bracelet shown above https://www.facebook.com/beadsandbubbles/

Beading Kits by Nealay Patel for this project and more are available in his
Etsy shop:
  https://www.etsy.com/shop/nealaypatel

And check out his new book Jewelry Made with Wire & Fiber for some great ideas that you can incorporate into your own designs, intersperse with art beads and jazz up your style!


UPDATE! Nealay has agreed to give away a copy of the digital version of his new book (retail value $21.99) to one lucky random winner for answering the following question:

Tell me...
what type of project would you love to see on a future installment of Beads & Bubbles?


Winner will be chosen at random from all entries
(one per person please!) and announced on July 14th!

Thursday, May 12, 2016

My First Bead Cruise

I (Michelle from Firefly Design Studio) returned a few days ago from my first Bead Cruise.  Our own Heather Powers says she plans her dream vacation and invites 65 friends to join her!  Heather keeps us busy, but there is plenty of time to enjoy the ship and ports.  For me, it was the top notch classes that got me excited.  This is what I took and learned:

Kerry Bogert is a wire worker expert.  She has written 3 books and has so many tips and tricks that she is willing to share.  My first class with Kerry was an earring class.  We received sheets of copper and brass, 24 g and 18g wire.  We punched circles and cut rectangles as well as punched small circles around the edges of our shapes.  It was fun texturing the metal with fancy hammers.  Here they are!
Next I learned chain making from Kerry.  She also showed us how to make a few kinds of clasps, which I was excited to learn.  We made 1 chain each hour.  We used dowels, pliers, punches, and made jump rings.  Which is your favorite?  Mine is the circle one, third from left.  I plan on dangling a ceramic bead at the end of the extender chains I made to make these bracelets and 1 necklace "me."
This necklace that Kerry taught us is so cool!  We used a coil machine, or hand coiling, as well as wrapping 16g wire around different sized dowels.  We connected our links together for this statement piece design!
Beverly Herman is a very talented, patient and fun seed bead instructor.  This is only my third time doing bead embroidery.  Time Traveler used multiple sizes of seed bead, pearls and a ceramic disc that I had the honor of making for the student kits!  I am about half finished at this point.  Isn't it going to be gorgeous?
Bead Cruise 2017 is already more than half booked.  I know the ship departs from Texas and is going to the Western Caribbean next year in February.  I am already going on a cruise in February with my friends, so I didn't think 2 cruises in 1 month would work with my schedule.  If you'd like to learn more, go to www.beadcruise.com and check it out.

Saturday, August 29, 2015

Wire Rocks!

The last time I blogged for Art Bead Scene, I shared a look inside my studio as I was getting ready for Bead Fest in Philadelphia.  One of the goals I set for my self while at a large show, is to learn a new skill to add to my jewelry designing arsenal.  I was fortunate to be able to connect with one of my favorite artists and designers, Staci Louise Smith, for an after show class she was teaching.  It was all about wire and connections and cool beads.  What's not to love?

Staci's class is called "Wild Wire Gypsy Charm Choker."  The kit included 16, 18, 20 and 22 gauge wire.  It was great to handle each one and learn more about differences and when to use each one. Staci annealed the wire before class to give it more flexibility and a vintage look.  The copper wire started out very shiny.  I found out I can anneal the wire with a hand held torch.  Pretty cool!

The base of the choker uses 8 feet of 16 gauge wire!  Thankfully it was cut into two 4 foot sections which made it easier to handle.  Every student hand formed the choker base so differently.  You really can't do it wrong after the basic shape is formed.  I found out I was in a symmetrical mood when I was designing my choker.  Staci told me it looked like daisy petals!


This is my finished necklace.  What an amazing statement piece!  I added some of my ceramic beads to the wonderful selection of gemstones, glass, metal, and polymer beads included in the kit.  I plan on making another unique choker necklace for an October Breast Cancer Awareness blog hop that Andrew Thornton is hosting.  I will use silver 16 gauge wire for the choker base with a wonderful mix of pink beads.  It is going to look so different, but equally amazing!

The good news is Staci is going to be teaching this wonderful class again at Bead Fest Philadelphia at the Spring 2016 show.  So if you love it like I do and want to learn some great techniques from an instructor that is so giving with her tips and techniques, don't miss it!

Thursday, February 21, 2013

Color Wire Tips

colored copper wire love 1

I <3 Colored Wire! 

I'm guessing you already knew that though! Spend any amount of time looking at my work and it's pretty obvious that I love the stuff. It allows me to add extra layers of color to my work and as a color lover, I don't know how I ever got along without it before I found it. 


two tone lovelies

There are some tricks to using it successfully, though, no matter what brand you choose to use! Here are a few of my tried and true tips:

  • Friction and colored wires don't mix. So, use it as part of a wire link but not as the link itself. For example, you could make a coiled cage for a bead with colored wire, but then use another metal to link together the beads with wrapped loops. 
  • It's durable but not indestructible. Avoid using it for clasps as the friction when it comes in contact with the catch for the clasp can cause the colored surface to wear away.
  • It works GREAT coiled but, I wouldn't use it as a core wire. I like to stick to using it to cover a core wire. For example, I like to make a coil of color, slide it onto a silver core wire, and then bend into shapes. Keep in mind, if using it as part of a bangle, you don't want beads sliding back and forth across the surface of it. 
  • It makes fun headpins and dangles and bail wires for your art beads. You can even hammer it! Keep your hammer strikes straight up and down, don't drag the hammer head when you hit the wire and it will flatten nicely. Be careful not to over flatten it though. 
  • Yes, you can tumble it!! Like other wires, you might find yourself needing to work harden it. You can tumble it in a rotary tumbler with stainless steel shot and cleaning liquid without damaging the surface. 
Keep these few tips and tricks in mind when adding colored wire to your work and it's sure to work great! Pop over to the Art Bead Scene Facebook page and share your colored wire creations with our followers! And if you are wondering what brand of colored wire I use, it's always Parawire for me.