🔥 HOT: Search/label/Vintage - High Quality

Showing posts with label Vintage. Show all posts

Tuesday, September 13, 2016

New Collection! Classic Rose

 
 Hi Friends!

A wonderful new collection has been released by Heartfelt Creations and it debuts today!  It's brimming with roses, rose buds, rose images, everything's coming up roses!! (Sorry, that was pretty bad LOL!).  And get ready - it's called "Classic Rose Collection!"  Ta Da!!  :)


The step by step instructions for the card I created are posted on the HC Blog this week!  I was going for the "rose gold" color with my roses using a pink-coral cardstock and gold embossing powder and Gold 3D stamp paint.  They came out a little more rosy than gold I think.


So, do pop on over to the HC Blog and you will be blown away by the amazing projects the Design Team has prepared with this beautiful collection!!  Those gals know their way around a rose!! Seriously!!  And, bonus, there's a "How To" video with Emma Lou to walk you through creating amazing 3-D roses!!  

Thanks so much for stopping by today! Have a blessed week everyone!!
Anne

Sunday, March 8, 2015

Vintage Style Ribbon Challenge Card


Hi Friends!

Thought I'd create a card to play along with the latest Really Reasonable Ribbon "Flowers and Ribbon" Challenge for this week.  I am an admirer of my HC teammate Kathy Clement (Kathy by Design) who designs the most amazing vintage style cards.  Her latest one is for this weeks RRR challenge so I was inspired to play along!

I used paper from Prima Marketing's Almanac Collection, Hug Snug Ivory Seam Binding, and of course couldn't help but make some flowers using Heartfelt Creations Bountiful Roses dies.


The image of the woman is from "Grandmas Attic Collection" called "French Ladies" collection by Pion Design -- I get these from Frantic Stamper (she has a gorgeous selection of Pion Designs - check it out!). 


I used Walnut Stain Distress Ink and Memento Luxe Angel Pink ink to distress the flowers, the paper edges and the ribbon to coordinate everything.  My embellishments are some swirl pearls from Want2Scrap and a bead charm from Michael's (found in my stash).


TFL, I'm so glad you stopped by!

Sunday, June 22, 2014

When I Stand Before God

Hi Friends,

This really great poem came to me in the form of this gorgeous hand-made card created by my good friend Sandy.  I've blogged about her work before - here - when she sent me my "initials" beautifully altered and shabby-fied. She pretty much single handedly launched my interest in altered art and vintage style card making.

This card that she made came amazingly embellished with embellished embellishments!!  Seriously, just about every detail on this card was altered in some delicate and subtle way, making the overall piece a wonderful work of art!  The front, the back, the inside, the envelope - she touched every part.  It's just gorgeous and I love it!  Thank you so much my friend!


"When I stand before God at the end of my life,
I would hope that I would not have a single bit of talent left,
and I could say "I used everything You gave me".
Author Unknown

TFL, I'm so glad you stopped by!

Saturday, May 31, 2014

Tim Holtz Layered Butterfly Die

 Hello All,

This card is made with the new TH "Layered Butterfly" die that comes with the coordinating embossing folder.  It's large and awesome and fun to create with!  This is just one of the cards I made with it this weekend.

I die cut the butterfly from DCWV paper, embossed it with the folder, distressed it a bit with Walnut Stain ink and mounted it to the card -- allowing it to bow out for dimension.

The background is stamped with a sentiment from TH "Phrases I" set and I added a metal tag from his "Word Bands" collection.  The keyhole down the center of the butterfly is by BoBunny. Yup, Tim Holtz is my hero!!

TFL, I'm so glad you stopped by!

Saturday, October 19, 2013

Altered Matchstick Holder


Happy Weekend Everyone!

This is a vintage matchstick holder that I altered as a gift for my sister Tina's birthday.  (The picture on the left is NOT the one I altered but I forgot to take a "Before" picture so it's just a sample of what they look like when they're in the original form.)  The one I used was unpainted, bare metal and banged up; nothing as nice as the red one in the photo!! LOL!


I painted the bare metal with a base coat of gesso, then dry brushed Turquoise and copper acrylic paint over it until I was happy with the faux rustic, patina color.  I downloaded a sheet of vintage images from this Etsy shop and chose one of the photos of a little girl with a flower cart to use on the back.  I printed it out, distressed the edges then glued it to the back of the holder.  I also added a faint smudge of TH "Worn Lipstick" distress ink on the flowers.


Next I picked out some vintage trims from my stash that matched the color scheme and glued them around the holder.  From there, I went through my stash of paper flowers and chose different ones that I thought went with the trims and the overall color scheme.


After getting those glued on, I chose to use this cute little straw and paper barn owl that I got from Hobby Lobby. It came on a card of three in the natural flower supplies section.  I just positioned him on the front of the holder and added more trims and flowers.

I also used some natural white flower-bud sprays that I got from the same section at HL along with some brown wire that I coiled, and just inserted them behind and among the flowers and trim.


Finally, I had these small rustic tin birds, that I picked up in Santa Fe during the same trip home this summer, that I wanted to use on the holder.  I added a tiny satin rose and feather to the front of one of them and glued a strong magnet to the back.  So now it comes off and can be used as a note holder on the tin or just completely separately. 


This is the holder without the little bird:

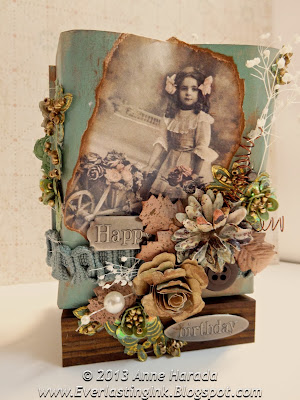
The back side showing the vintage image and some metal tags saying "Happy Birthday"
The only problem I had was getting it to sit on the table top without falling backwards!  It kept falling over when I put pens or scissors in there as a test to see if it would hold anything. Because it was originally designed at an angle to hang on the wall - that would allow the matchsticks to roll forward so the well stayed full - it would not stay standing!! Boo!!  So Carl, my amazing husband to the rescue.  He cut a piece of heavy wood as a base to accommodate the slant, screwed it onto the bottom, and now it is the perfect little desktop tin holder!  I love it!!

Here's some photos from other angles:
You can see here how much of an angle the slant was at.


View from the top - You can see how it is banged up in the back
My "vision" of it being used as a desktop accessory for pens and business cards!
Hope you enjoyed this post!

TFL, I'm so glad you stopped by!