💥 TRENDING: Gallery - HD Photos!

28 December 2021

Altenew - Creative Colouring with Erum - Advanced Techniques

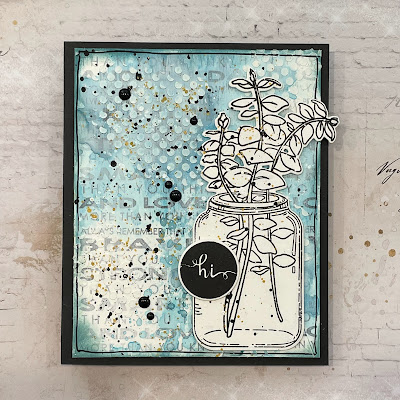
The Creative Colouring with Erum Advanced Techniques was such a fun Altenew class to do, and Erum showed us some awesome techniques! Since I am someone who usually spends quite a bit of time watercoloring, I was excited to try the splatter technique that Erum showed in Lesson 5. And I know I will be using this technique a LOT from now on! It was simple to do, yet the results are so beautiful! 


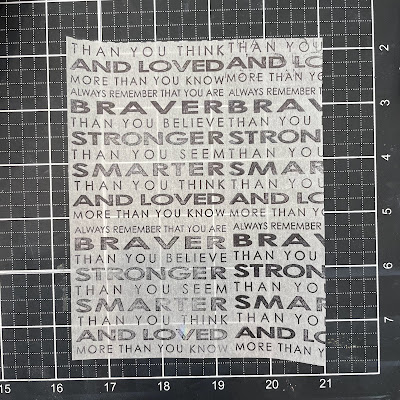
I started by stamping the image from the Altenew Blossom & Bloom stamp set in permanent black ink on a piece of Altenew A2 watercolor paper. I also stamped the image on some scrap printer paper to create some masks, since this image was all one piece and I wanted the leaves and flowers in different colours. 

I masked off the leaves and then sprayed the flowers with water and used the splatter technique Erum shared to add color to the images using the Altenew Artist Watercolor set. The colours for the flowers were: pocketful of sunshine, summer afternoon and delectable delights. I then dried it off before adding a few more splatters.

When that was dry, I masked off the flowers and did the same process with the leaves. The colours I used were Rainforest and Tropical Forest. I then added some white splatters to the whole image, dried it and  cut it out using the coordinating die.

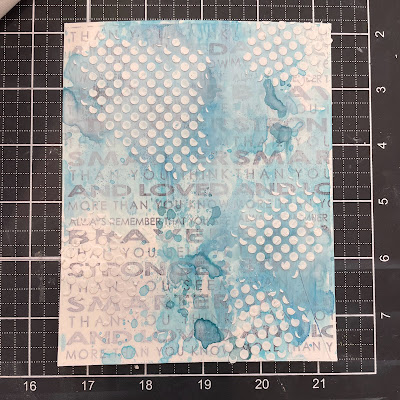
To create my background I used the exact same technique as the flowers, using shades of blue. The colours were Deep Blue Seas and Starry Night. Once the first layer was dry I added some darker splatters and then some gold splatters using the metallic watercolours. 

I trimmed my background panel down a little and attached it with Altenew foam tape to an A2 top folding white card base. I used more foam tape to adhere the focal image. 

I stamped the sentiment from the 'Tiny Sentiments: Hello' stamp set in clear embossing ink onto black cardstock and embossed with pure white embossing powder. I trimmed it down and attached it to the front of the card. I then added some white enamel dots to complete the project. 

Thanks for visiting my blog and I hope you liked this project. I sure had fun making it! 


Supplies:

27 December 2021

Altenew - Demystifying Mixed Media

I cannot believe this is my second last project for Level 3 before my final challenge! I had hoped to be completed by the end of this year, but life has thrown us quite a few curve balls which meant that crafting had to take a bit of a back seat. 

But I had fun completing this class with Tania Ahmed called 'Demystifying Mixed Media'. I have been playing a bit lately with mixed media and art journalling so I loved getting lots of new tips that I could incorporate into my card projects. 

The two main lessons I drew inspiration from for my card were Lesson 1: Textured backgrounds using pastes and Lesson 5: Text Book Collage 

Mixed media is all about adding layers of colour, techniques and textures to your project. And I started this card by creating my own text book collage paper using one of the sentiment stamps from the Eucalyptus Jar stamp set. I stamped it repeatedly onto a piece of tissue/collage paper (4.5"x6.5")  in permanent ink. This is what it looked like when it was completed. 

I then use a collage medium to attach it to a piece of white card stock the same size. I also went over it with a thin layer of white gesso to tone down the background a little. Once that was dry, I added some Altenew Dusk and Desert Night inks to my craft mat, spritzed with water and smooshed it onto my background. I dried that and then repeated to get a couple of layers of colour.  I then dried it again before adding some white embossing paste through the 'Feeling Dotty' stencil and left it to dry.

While that was drying, I stamped the large jar image and the 'Hi' sentiment from the same stamp set in permanent black ink and cut them out with the coordinating dies. I then used Altenew foam tape to attach them to the front of my panel for extra dimension. For more interest I splattered some black, white and gold paint onto my panel and added some black enamel dots as well.  I then went around the edge of the panel with some Dusk Ink and drew a line around the outer edge using a black marker. 

I attached it to a black 5"x7" card base using foam tape and that completed my card. I hope you enjoyed my project, as I had a lot of fun trying new techniques and creating this card!


Supplies:


27 September 2021

Altenew - The Magic Of 3D Embossing

3D embossing folders are so popular right now, and Altenew has a large collection of fabulous ones to choose from! I have bought several these folders, so I thought this Altenew Academy course with Laurel Beard would be perfect and I have learnt lots of fun techniques for using 3D embossing folders. 

I chose to use the technique that Laurel demonstrated in Lesson 4 - Jazzing It Up where she stamped the card stock before embossing.

I started with an A2 piece of pale blue cardstock and stamped the sentiment from the Painted Greetings stamp set in Jet Black ink before putting it in the Bunch Of Balloons embossing folder and running it through my die cut machine. 

TIP: Rub a baby wipe over the card stock before embossing, it helps break down the fibres and prevents cracking.

I then trimmed the blue panel down before adding a black mat and attaching it to an A2 white top folded card base using foam tape. 

To complete the card, I added some clear sequins. 

Supplies:


26 September 2021

Altenew - Clean, Simple & Colourful Techniques

For today's project, I have created a card using the techniques learned from Laura Bassen in Lesson 4 of the Clean, Simple & Colourful Techniques class, called Masking and Ink Blending. In this class Laura created a rainbow ink blended background using masking tape so I have used the same techniques, but in a different pattern. 

I started by stamping the floral image from the Fairy Tale Florals stamp set onto an A2 piece of white card in clear embossing ink, and heating with white embossing powder. I then took a piece of 1" post it tape, and starting from the top I masked off and ink blended working my way down to the bottom, making sure to leave a little white space between each layer. 

The colours I used were Mango Smoothie, Caramel Toffee, Coral Berry, Lavender Fields, Winter Lake, Caribbean Sky and Mountain Mist. I also splattered some Altenew Pearl Gold watercolour and white ink onto the panel. 

I then trimmed the panel down 1/4" and mounted it onto a black A2 top folding note card.  To create the sentiment I die cut the Handwritten Hello die twice from white cardstock and once from gold card and layered them together, using liquid glue to attach them to my card. 

To complete the card I added some gold jewels.


Supplies:


Altenew - Quick and simple cards for everyday crafting

I have just completed Quick & Simple Cards for Everyday Crafting with Laurie Willison with Altenew Academy, and I really loved this course! Sometimes, when you don't have a lot of time to craft the ideas shared in this class will come in handy for putting together beautiful (but quick!) cards.

I have made my card today using the concepts taught by Laurie in lesson 2 - Creating a quick and simple card with a background focus. Altenew has so many great background stencils, that it was hard to choose, but in the end I decided on the Geometric Landscape stencil. 

I started by placing the stencil on a piece of A2 card and ink blending using Altenew Inks (in Emerald, Lagood, Volcano Lake and Mountain Mist).  I then trimmed the panel down half an inch off each side and placed some Altenew double sided foam tape to the back before attaching it to an A2 top folded white card base. 

I then stamped the large floral image from the Hello Beautiful kit in permanent black ink onto white card and cut it out using the coordinating die. I then stamped the sentiment from the Heartfelt Sentiment stamp set in clear embossing ink onto black card and heat set it with white embossing powder. I then used double sided foam tape to attach the flowers and sentiment strip to the front panel and finished the card off with some black enamel dots. 

Thanks for visiting my blog and have a great day! 


Supplies: