💎 PREMIUM: Gallery - High Quality

Tuesday, September 26, 2017

Sledding Critters (Avery Elle)

Hi there!

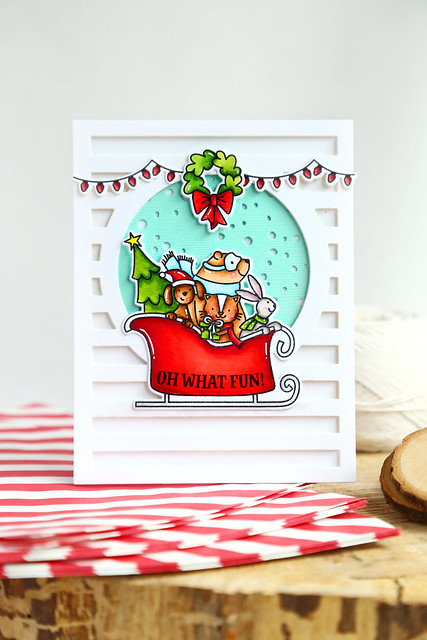
I have a fun card to share today, featuring Avery Elle's Sledding Critters.

Sledding critters (Avery Elle)

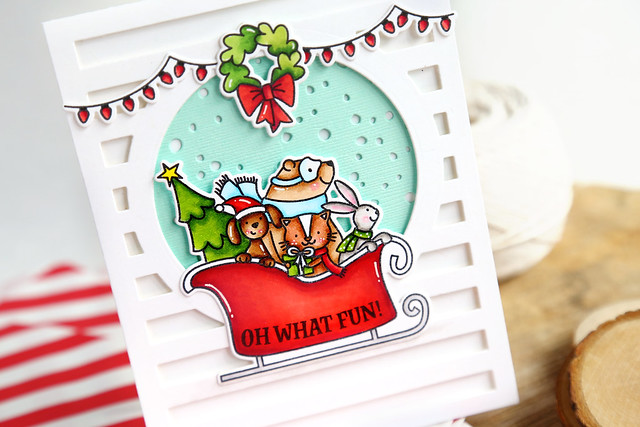
I loooved the critters found in the previously-released Birthday Bus, and this one features a few of the same characters. I was so excited to ink them up and start coloring! The bear with the snow goggles? I die.

I colored and die-cut the main image and stamped a greeting from Brring On The Joy directly onto the sled.

To back the critters, I grabbed a sheet of minty cardstock and ran it through the die-cutter using the Falling Snow die. I used it a ton last year and don't see myself putting it out of reach for this holiday season either. 

Sledding critters (Avery Elle)

To frame the snow and sledding animals, I layered a Horizontal Stripes die-cut over my white card base. The tone-on-tone isn't busy, but is so much more interesting than just layering onto a plain folded card.

Finally, I stamped a few strings of lights to go across the top, and in the center, a wreath (from Brring On The Joy.)

I hope you like it!

Thanks for stopping by!

♥.

Monday, September 25, 2017

Pinkfresh Studio Stamp release blog hop

Hi there!


Welcome to the Pinkfresh Studio September Stamp & Die Release blog hop! To celebrate there is a fun blog hop to inspire you and introduce you to some of the latest designs.

To make the hop even more fun Pinkfresh is hosting an amazing giveaway. One lucky winner will receive the entire September stamp & die release. To enter to win, please follow along with our blog hop and leave a comment on EACH post along the way! Comments will close at 11.59pm CST on Monday October 2nd 2017.

The winner will be randomly selected and announced on the Pinkfresh blog on Monday October 9th 2017.

I created a few cards to show off today.

First up, I couldn't wait to stamp and color the full-card-sized image from Happy Holidays.

Pinkfresh Studio stamp and die release blog hop SaveSaveSaveSaveSaveSaveSave

I used the MISTI tool to stamp the image, so that I could get a really good impression. I wanted the letters to be c-r-i-s-p.

I kept the color palette to light browns and reds and used a light copic marker to draw in some rolling hills to give some depth to the image.

Pinkfresh Studio stamp and die release blog hop

I couldn't help but color the girl a second time, cut her out and pop her out a bit. I just think she is the sweetest!

Even un-colored the image is so cute. I could see making a set of folded cards to give out as gifts.

The next card I made uses the fun set, Simple Joy.

Pinkfresh Studio stamp and die release blog hop


This Santa is in relaxation mode! I imagined him reading a few thank you notes or the paper on Christmas morning? I colored his sweater red, because you can't take that color away from Santa! and gave him a pair of jeans to wear (rolled up, hipster style! ha.) My favorite is the fading of his jeans on the butt! I used a colorless copic marker to remove some of the blog from that area.

Pinkfresh Studio stamp and die release blog hop

I thought the graphic background worked nicely with the fun Santa! I cut out a circle where Santa could rest on the card base and popped up the patterned paper. I used a warm grey copic marker to color around Santa, so that he would stand out even more.

Instead of stamping a sentiment, I used Pinkfresh stickers to highlight that this scene is happening on Christmas morning.

I hope you like my cards!

It's time to hop on over and see what the rest of the team dreamed up:

Wednesday, September 20, 2017

Scalloped holiday treat box (Lawn Fawn inspiration week)

Hi there!

It's the last day of this month's Lawn Fawn inspiration week, and today I'm featuring the Scalloped Treat Box Winter House Add-On. Whew, that's a mouthful!

Scalloped holiday treat box (Lawn Fawn inspiration week)

I love simplicity in my Christmas decor, so I decorated this box in colors that would fit my holiday look.

I cut the treat box out of the lighter woodgrain pattern paper, and adorned it with mostly white elements and a few pops of red.

Scalloped holiday treat box (Lawn Fawn inspiration week)

The red bows add the perfect little punch to the front of the house! I also added 2 layers of the roof die-cut, which I think adds a touch of softness.

Scalloped holiday treat box (Lawn Fawn inspiration week)


I added a little white chimney and a puff of "love" smoke rising from it. Having the chimney there allowed me to bring some height to the box, which I think makes it look even cuter.

I hope you like it! The box came together very easily and quickly but makes a huge impact. I can't wait to make a few more and hide little treats and gift cards in there for the kids' teachers.

Hop on over to the LF blog this morning to see more - click!

♥.

Tuesday, September 19, 2017

Christmas dreams (Lawn Fawn inspiration week)

Hi there!

Lawn Fawn inspiration week is moving along! Today, we're taking a closer look at the cozy set, Christmas Dreams.

Christmas dreams (Lawn Fawn inspiration week)

I wanted to create a living room scene, and give some dimension to show that the fireplace is a little removed from the tree and the kitty, so I placed it within a cut-out to give that illusion of extra room space. I used a piece of subtle grey knit paper, from the Knit Picky paper collection to back the fireplace.

Christmas dreams (Lawn Fawn inspiration week)

To ground all of the cute images, I used a strip of woodgrain paper for the "floor." I just love all of the elements included in this set! It was so much fun to color and put together.

I hope you like it! There's more to see on the LF blog this morning - click!

♥.

Monday, September 18, 2017

A wreath for Christmas (Lawn Fawn inspiration week)

Hi there!

Lawn Fawn inspiration week is in full swing, and today I'm showing off the Large Wreath dies.

A wreath for Christmas (Lawn Fawn inspiration week)

I made the wreath even larger than intented by using it without the included circle frame. I cut a ton of sprigs in white, and layered them to make a snowy wreath. I then cut little red berries and added glossy accents to make them look more 3D.

A wreath for Christmas (Lawn Fawn inspiration week)

I layered the wreath onto a sheet of light blue paper that I embossed with the Stitched Woodgrain Backdrop - I love a red and blue color combo!

A red paper bow and little hanging mittens finish things off.

I hope you like it!

There's more to see on the LF blog this morning - click!

♥.

Sunday, September 17, 2017